When you build a Table with columns showing growth, margin, or other calculated measures, there's a neat way for you to calculate the totals. While summing values works perfectly for things like revenue or units sold, it is not always as easy as that for percentages and ratios. Instead of a sum of ratios, you often need a ratio of sums.
That's where advanced aggregators come in. In this article, we'll show you how!
1. Forecast Table
In this first example, you’ll build a year-over-year growth table with your actual results for Y0 and your forecasts for Y+1. It’ll sum up your forecasts for each product line based on the growth you expect on your Y0 actuals.
For this, create the following Metrics and Tables:
Growth Forecast Metric
This Metric holds manual inputs giving the expected growth.
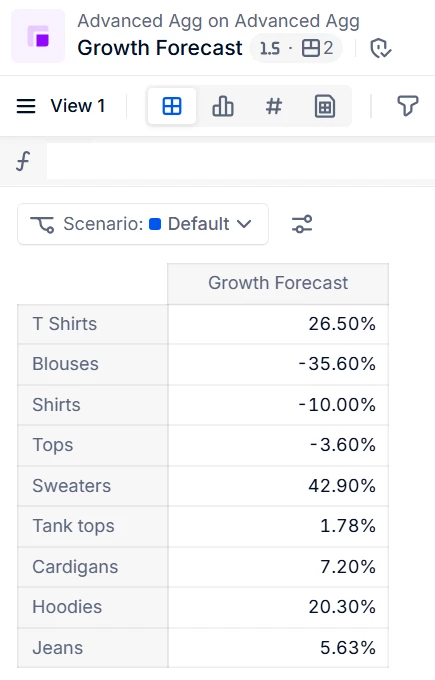
Create a Metric called Growth Forecast with Number data type. Its Dimensions are Product line and Year.
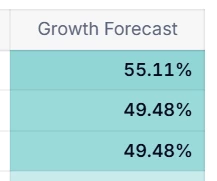
Input the forecasts by product line in the form of year-over-year expected growth percentages:
Forecast volume Metric
Take your Metric of Actuals for the current year and duplicate it.
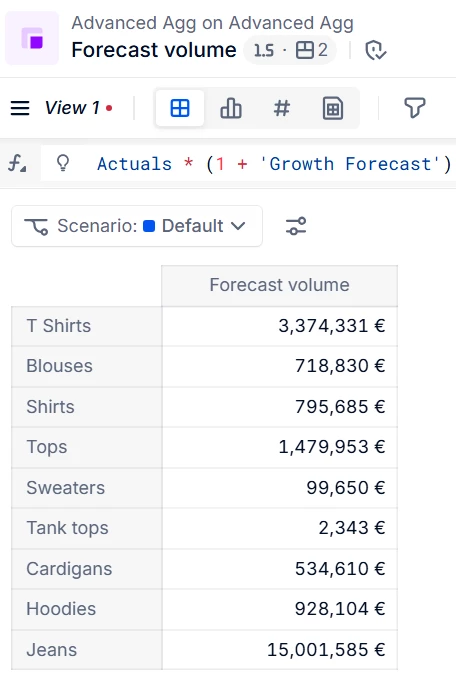
Rename the copy Forecast volume and write in a formula of the type“Actuals * (1 + Growth Forecast)”.
The Metric populates with volume data for the year being forecast, reflecting the growth inputs:
Forecast data table
Create a Table for forecast data and add the following Metrics in this order:
Actuals
Forecast Volume
Growth Forecast
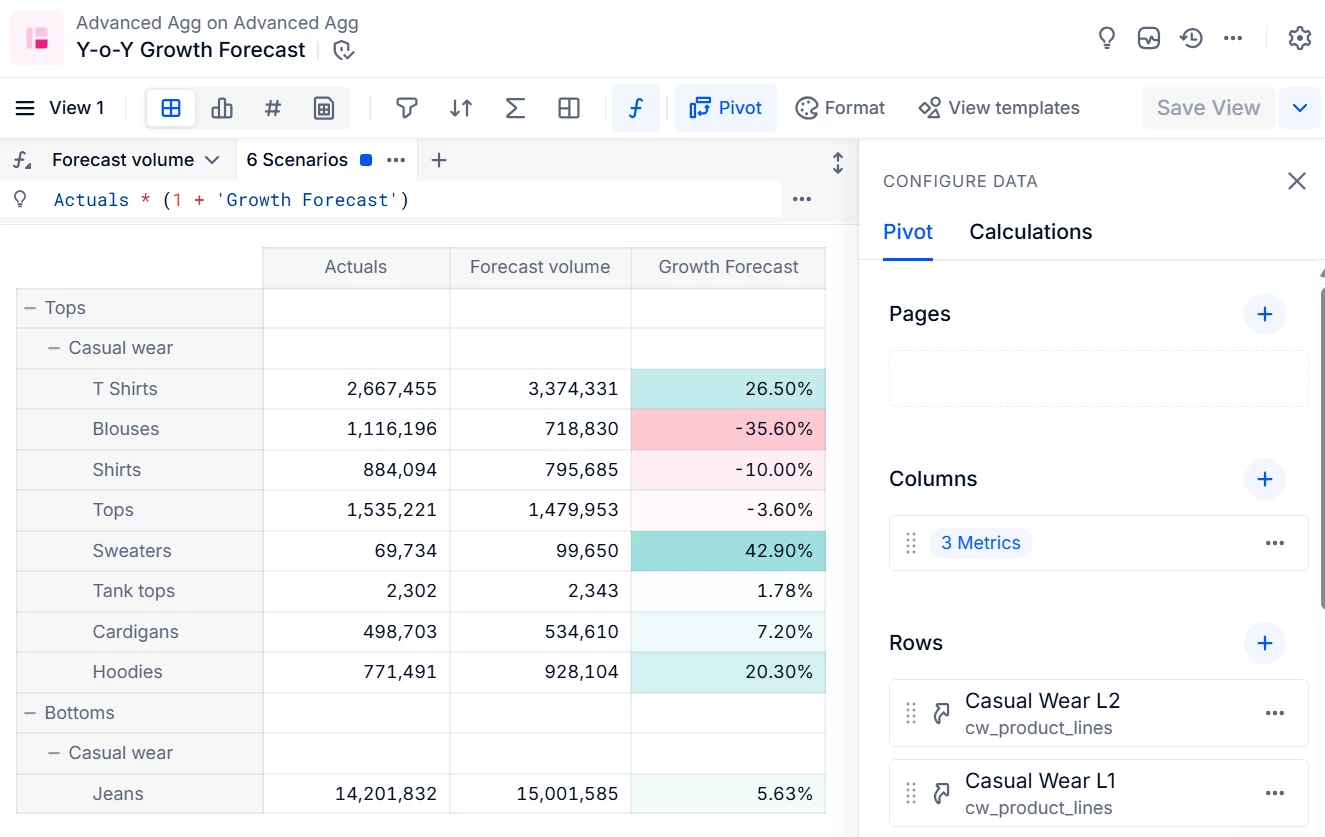
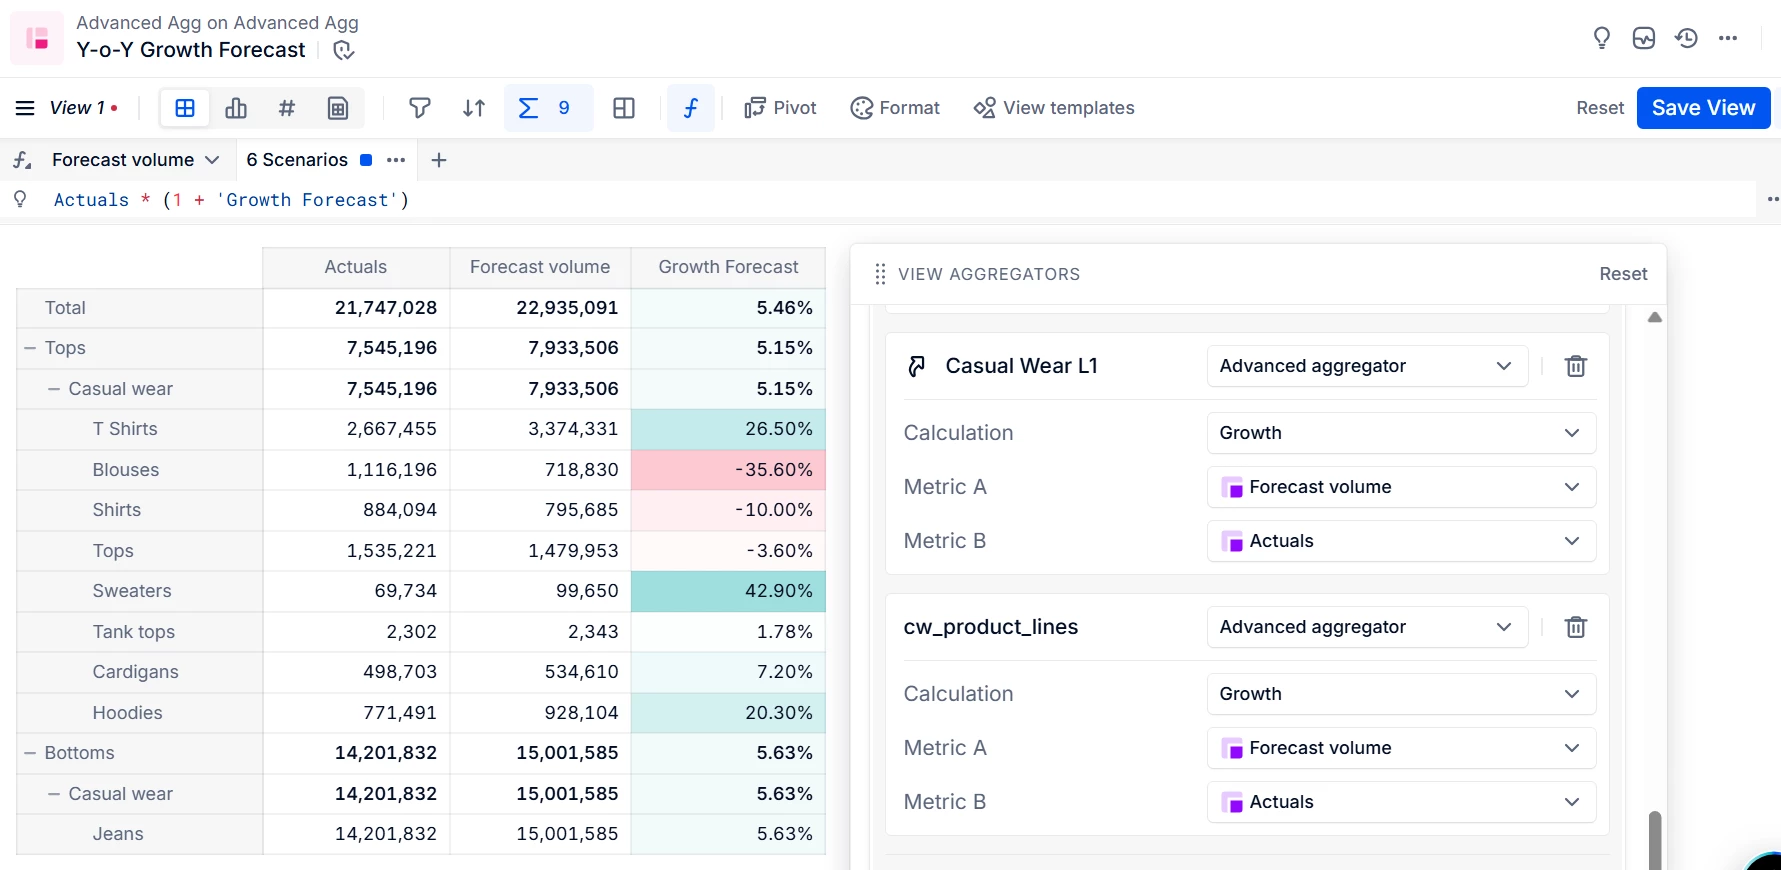
In Pivot, set the Metrics up as Columns. The example also has some product hierarchy levels, Casual Wear L1 and L2, for illustration:
Set up aggregators
The topline numbers are still blank in our Topline data table. Using the tools in the 𝝨 menu, found in the top toolbar, you can set up aggregations for these.
First the simple aggregators:
Select 𝝨 from the top toolbar.
Add Sum aggregators to the Table. The quick way to do this is:
a. Select + Add by one of the Dimensions, and then select Sum.
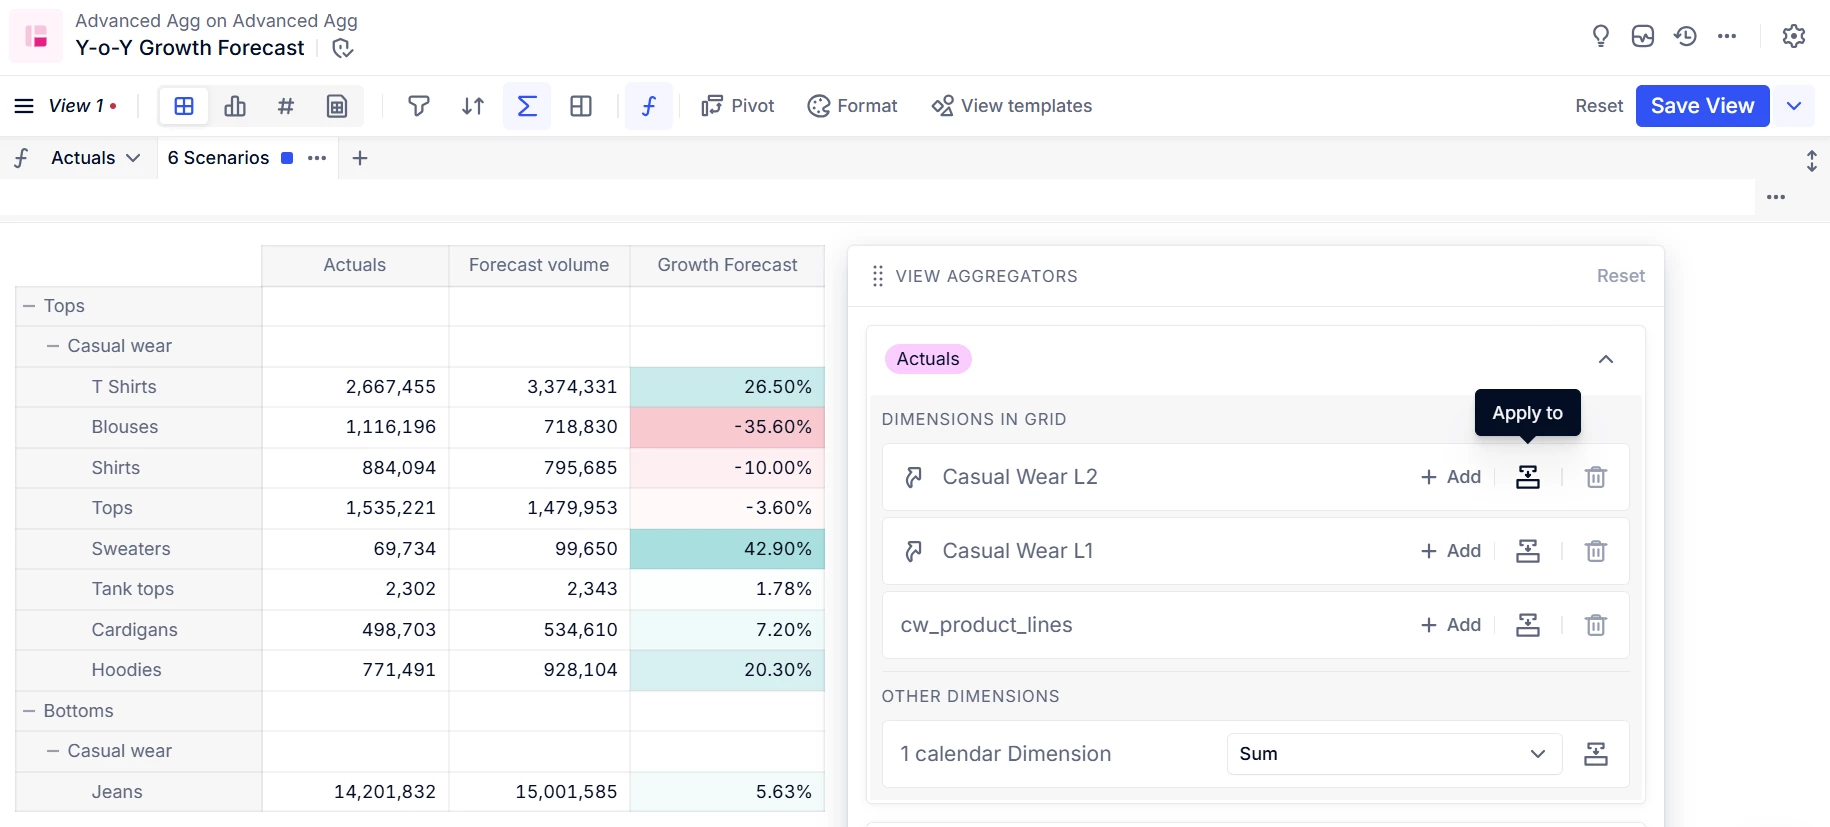
b. Select the Apply to symbol to the right (see picture), and then Apply to the entire grid.
c. Select Apply to close out the dialog.
This fills the blanks for overall total and first- and second-level aggregations. But wait! The Growth Forecast column is summing the percentages, which we don't want. Let’s fix that.
Add advanced aggregators to fill the growth measures:
In the 𝝨 menu, select the third Metric, Growth Forecast.
In the first Dimension, Casual Wear L2, instead of selecting the Sum aggregator, scroll down to the bottom of the drop-down and select Advanced aggregator.
In the pane that opens, for Calculation, select Growth. For Metric A, select Forecast Volume. For Metric B, select Actuals.
Select Apply to all Dimensions using the symbol to the right.
Select Apply. Your Table should look like this:
2. Rule of 40
SaaS businesses sometimes use the "Rule of 40" as a key performance indicator. The rule says a company's combined year-over-year growth rate and profit margin should be more than 40%.
In this example, you'll set up a Table to check Rule of 40 compliance by month, across two distinct operational regions—and at the topline level, too.
Revenue Y0 and Y-1, and Costs
Create a Metric calledR40 Revenue Y0, with Number data type. Its Dimensions are Month and Country. Input your monthly revenues for the current year, Y0.
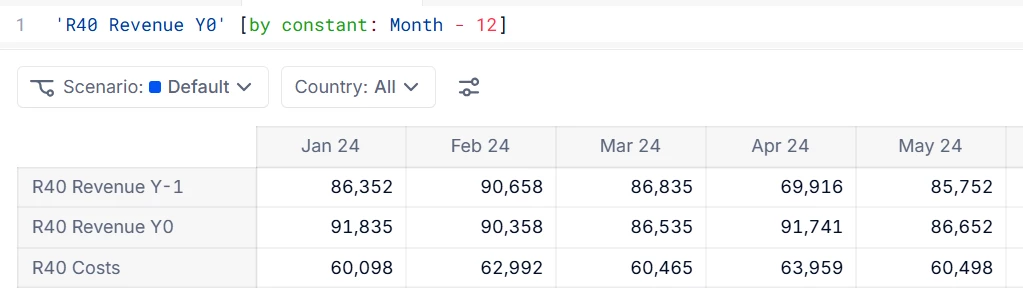
Duplicate it and rename the copyR40 Revenue Y-1. Add a formula such as'Revenue Y0' [BY CONSTANT: Month - 12]to become your Metric of revenues for last year, changing input values as desired.
Duplicate that and rename the copyR40 Costs. Input your monthly costs for the current year.
Add these to a Table.
In the Pivot menu, ensure that the Country Dimension is moved up to Pages.
It should look similar to the below:
Indicators
You now have the data needed to generate three indicators. Create three more Metrics named as in the below list, with the same Dimensions: Country and Month.
ForMargin%add a formula:('R40 Revenue Y0'/'R40 Costs')-1
ForRevenue growth%add a formula:('R40 Revenue Y0'/'R40 Revenue Y-1')-1
ForRule of 40add a formula:'R40 Margin%' + 'R40 Revenue growth%'
We’re going to add Year totals to the right of the Table:
Select the first Metric R40 Revenue Y-1
Select Sum for the Month Dimension.
Use the Apply to symbol to apply this to the entire grid.
Notice that with ‘All’ countries selected in the Page selector, theMargin%andRevenue growth%are showing the sum of ratios, which is not meaningful. As a result theRule of 40 measure is also not meaningful. Also, the totals to the right are fine for the revenue and costs but are not right for the growth and margin percentages.
We need, instead, the ratio of sums. For this, we set up the following advanced aggregators:
For theMargin%Metric:
Select 𝝨 from the top toolbar.
Select theMargin%Metric, opening the pane of aggregator options beneath.
Under Month, select Advanced aggregator from the drop-down.
In Calculation, select Growth.
SelectRevenue Y0for Metric A andCosts for Metric B.
Use the Apply to all Dimensions symbol to add this to the hidden Dimension too.
For theRevenue growth% Metric, repeat the above, using Revenue Y0 and Revenue Y-1 for Metric A and B. Then Apply to all Dimensions.
For theRule of 40 Metric, repeat the above, using Sum for the Calculation, Margin% for Metric A and Revenue growth% for Metric B. Then Apply to all Dimensions.
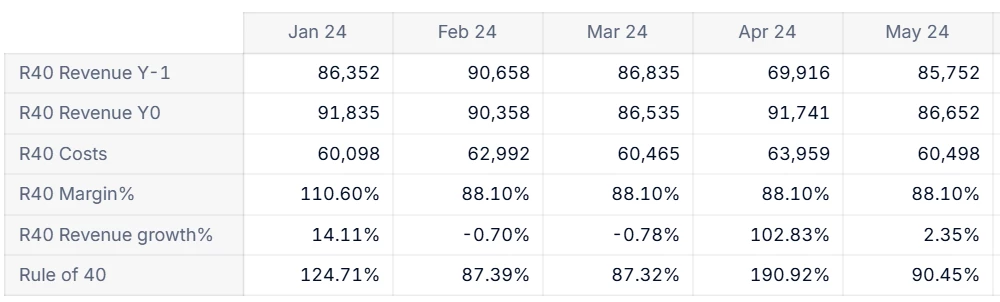
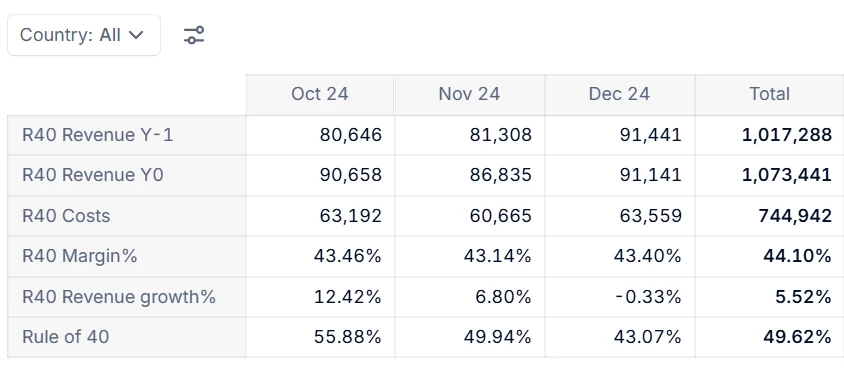
Hit Apply and all the ratios by month and the year totals are now up-to-date:
Add ratios that reflect your selection dynamically
You can set up your Table so that ratios remain meaningful when you change the view on-the-fly using selectors:
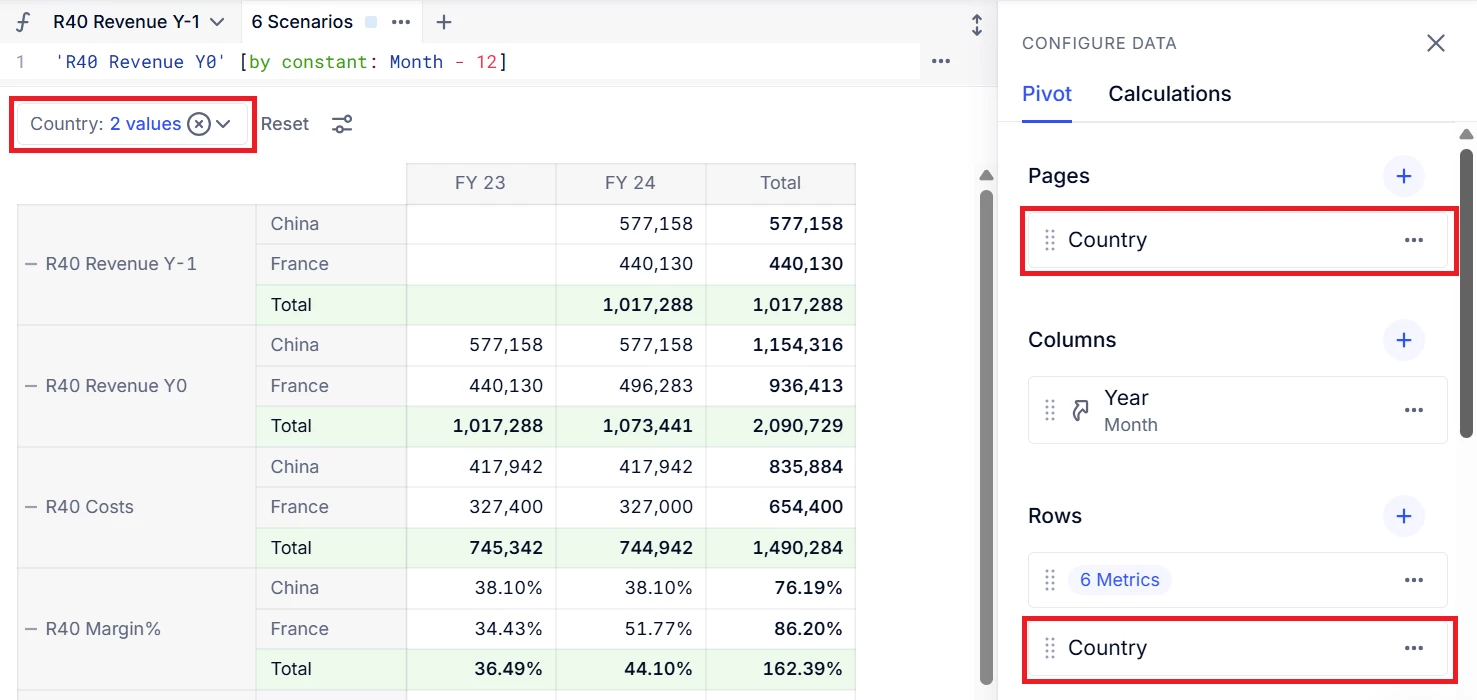
In the Pivot menu, add the Country Dimension as a Row below your Metrics. Swap Month for Year and add totals too, so that the grid and Pivot panel look like this:
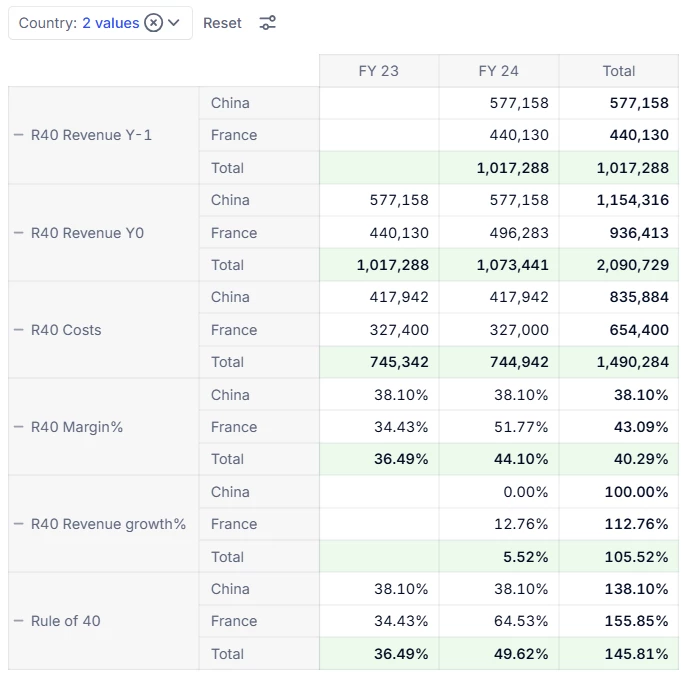
In the 𝝨 menu, for Revenue Y-1, Revenue Y0 and Costs, select Sum aggregators in the Year and Country Dimensions.
For Margin% and Revenue Growth%, select Advanced aggregator > Growth as above.
For Rule of 40, select Advanced aggregator > Sum as above
Now when you change your selection of countries in the Country Page Selector, the Table updates the numerical and ratio data.
I hope these two examples help you streamline your reporting in Pigment. If you’ve found a creative way to use advanced aggregators in your own workspace, drop a note in the comments! I’d love to see what you're building.