
This article discusses how you can use Scenario feature and the snapshot functionality to compare your current application to previous instances of it that were snapshottted. If you are unfamiliar with the snapshot functionality, please refer to this article. For more information on the Scenario feature, check out this article.
Table of Contents
What does the “Compare to Snapshot” functionality do?
With the “Compare to Snapshot” feature you will be able to compare side-by-side current data of your live model to data from your snapshotted application. In order to have access to the ability to compare snapshots you will need to activate Scenarios first.
What can be compared?
You can compare Snapshot and current model data side-by-side in Metrics and therefore Tables. This can be done through access on a Board or by directly opening up the Metric or Table.
Using Calculated items and Show Values As to compare snapshots
You can use snapshotted Scenarios in Calculated Items and Show Values As . This will allow you to perform “on the fly” calculations to compute differences between your current application and a Snapshot.
What are the limitations?
Using items from snapshots in Filters, page selectors and Sort
List items being displayed in filters and page selectors will be restricted to items in the current model. Items that only existed in the Snapshots won’t be displayed in page selectors and filters.
By default, items that existed in both the current model and Snapshot will be displayed first, and items that were only existing in the Snapshot last. If you apply a Sort it will be applied to all items.
How does compare to snapshot handle application changes?
Grouping properties representing a hierarchy (Department > Employee)
Grouping properties are used to link together multiple dimensions together and can change from time to time. When using the compare-to-snapshot functionality you will always see the groupings that are present in the current application. Let's look at an example using an employee list and a department grouping.
Let's say you have an Employee list with an employee named Sam originally under the Accounting grouping at the time of a snapshot. If Sam now is under a Sales grouping, when using the Scenario page selector to compare our current application to a snapshot, Sam will appear under the Sales, or the current active grouping.
If you do want to access old groupings, you can access them by navigating directly to the Snapshot by clicking History on the sidebar and then the Snapshots tab.
However, when using the compare functionality you will always see the active grouping.
Creation or Deletion of Blocks
Be aware that comparison with Snapshots will only work with Blocks that existed in both versions of your model, the live version and the snapshotted version. When comparing newly created Blocks, we will display empty cells for the Snapshot. Same if you delete a Block in your model, you won’t be able to compare it anymore to your Snapshot, so be careful when deleting Blocks.
Renaming of a Metrics, Labels or Items
When you rename an Item, Metric, or change a label. The label shown when using the compare to snapshot functionality will always display the current item name. If you wish to see the previous names, you can open the snapshot directly.
New items
By default, items that exist in both versions, live and snapshotted, will be ordered in the same way that in the current dimension lists. If an item does not exist anymore will be added at the end.
For example, in the screenshot below, we are comparing two scenarios (Default, Pessimistic) and a Scenario from a Snapshot (Snapshot). In this example, the item "new country" did not exist in the Snapshot and was created later ; and the item "ES" existed in the snapshot but no longer exists. If there is a cell that did not exist at the time of a snapshot, it will appear blank in that snapshot. If an item was delete and does not exist in the current model, it will also appear blank.

Be careful when updating lists, don’t remove items unless it’s really necessary. For example, if you want to rename a country, don’t create a new item and delete the old one, rather rename existing item. We are mapping lists’ items through its unique identifier, we are not mapping them through its name, so that we can still match items that have been renamed (for example, we will be able to still match “FR” to “Fr”).
What happens if I change the dimensionality of my metric?
If you have added an extra dimension, your metrics will show the new dimensionality but the snapshot will not have data at that level.
For example, your Metric was defined by “Team” in the Snapshot, and now it's defined by “Team” and “Country”. You will still be able to compare at “Team” level. When displaying the extra dimension, data from the Snapshot will the aggregated.

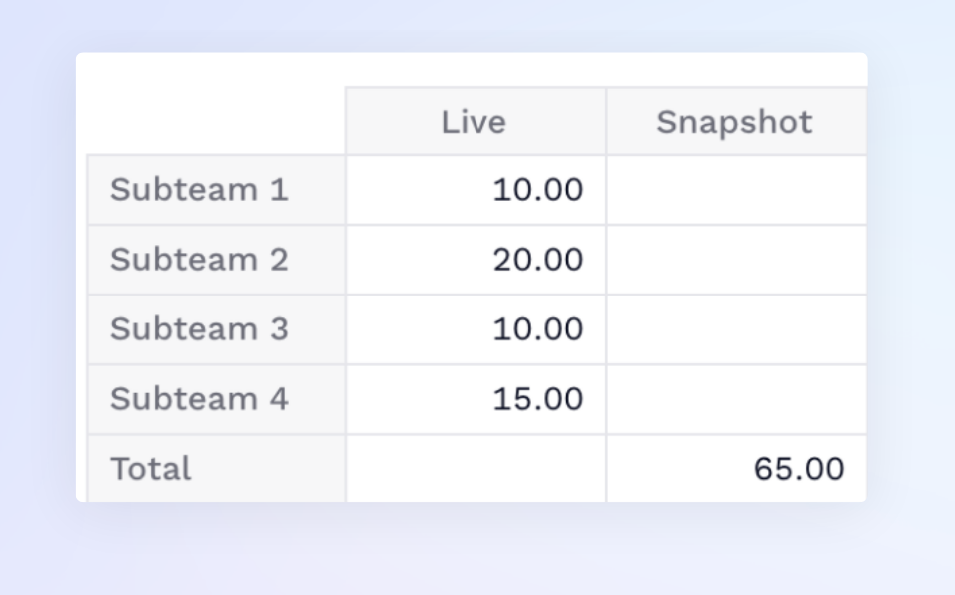
If you have removed a dimension from a Metric since the snapshot, Pigment will aggregate the data on that snapshot so that you can compare. If you plan to compare with a Snapshot make sure that your model has already the same granularity as the one that you will be using during the months to come. For example, your Metric was defined by Team in the Snapshot, you changed the dimensionality of the Metric and now its defined by Subteam. Live data is going to be breakdown by Subteam and the Snapshot data is going to be aggregated:
Metric’s Data Type changes
You won’t be able to activate the comparison on metrics that have changed Data Type. In such a case Snapshot cells will be “empty”.