In Tables or Metrics, you use a Calculated Item to add a calculation using data from specific items within a Dimension. If you want to compare data from all items within a Metric, check out this article on Show Values as.
This article explains how to set up a Calculated Item and provides some examples.
When you use a Calculated Item instead of writing a Formula in a Metric, you need to remember that Calculated Items cannot be referenced by other Metrics.
Adding a Calculated Item
Here’s how you create a Calculated Item using specific calculation requirements.
- In your Metric or Table, do one of the following:
- Click Pivot. In the Configure Data panel click the arrow next to a Dimension, and then select Add Calculated Item.
- Click the arrow next to an item in your Dimension and select Add Calculated Item.
- Click Custom calculation.
- To configure your Calculated Item, you can update any of the following fields as you need.
More information on these options is available in Calculated item Options.
By default, the name is Calculated Item or the preset name, if you choose to use a preset.
b. Select the position of your Calculated Item.
You can position this before or after a specific item, or before or after all items.
c. Select the type of calculation you want.
You can read more about these below in Types of Calculations.
d. Select the specific items needed for your calculation.In the Item menu, there’s the option to create a custom variable for your new custom Calculated Item. For more information, see Item Variables.
- Click on Apply, and your new item is ready!
Reorder Calculated Items
When you have Calculated Items in your Table or Metric, you can view them in the Configuration Data pane. In the Pivot tab, you can see where your Calculated Items are applied, and in the Calculations tab, you can reorder them in the order in which you want the calculations to occur.
For more information, see Reorder Calculations in Pigment.
Edit or Delete a Calculated Item
If you want to edit or delete a Calculated Item, do one of the following:
- Click Pivot.
- In the Pivot tab, click the menu (…) on the required Calculated Item.
- In the Calculations tab, hover over the required Calculated Item, and click the Edit or Delete icon.
- Click the arrow on a Calculated Item header, and select Edit Calculated Item or Delete Calculated Item from the menu.
- Right-click a Calculated Item cell value, and select the option you require from the menu.
Calculated Items on stacked or group Dimensions
You can add Calculated Items on stacked or grouping Dimensions within a Metric or Table. A stacked Dimension is one that is placed on top of another Dimension within the pivot.
Working with stacked Dimensions is like working with an item at the lowest position in the pivot. When you open the Pivot pane, you see that the Calculated Item appears at the same level as the item that it is applied to. All Dimensions positioned below it will appear in the same order.
A grouping Dimension is when you use a grouping property to display data at a different level. For example, If your data is at the Month level, you might use a grouping property to display it by Quarter or by Year. When they’re added to a pivot, their format is easily identifiable: the original Dimension, followed by a > symbol, then followed by the grouping Dimension. For example, Month > Quarter.
When you add a Calculated Item on a grouping Dimension, this automatically turns on subtotals that are set by default to SUM. This is how the Calculated Item performs its calculations. If you adjust the subtotals, the calculation are also adjusted.
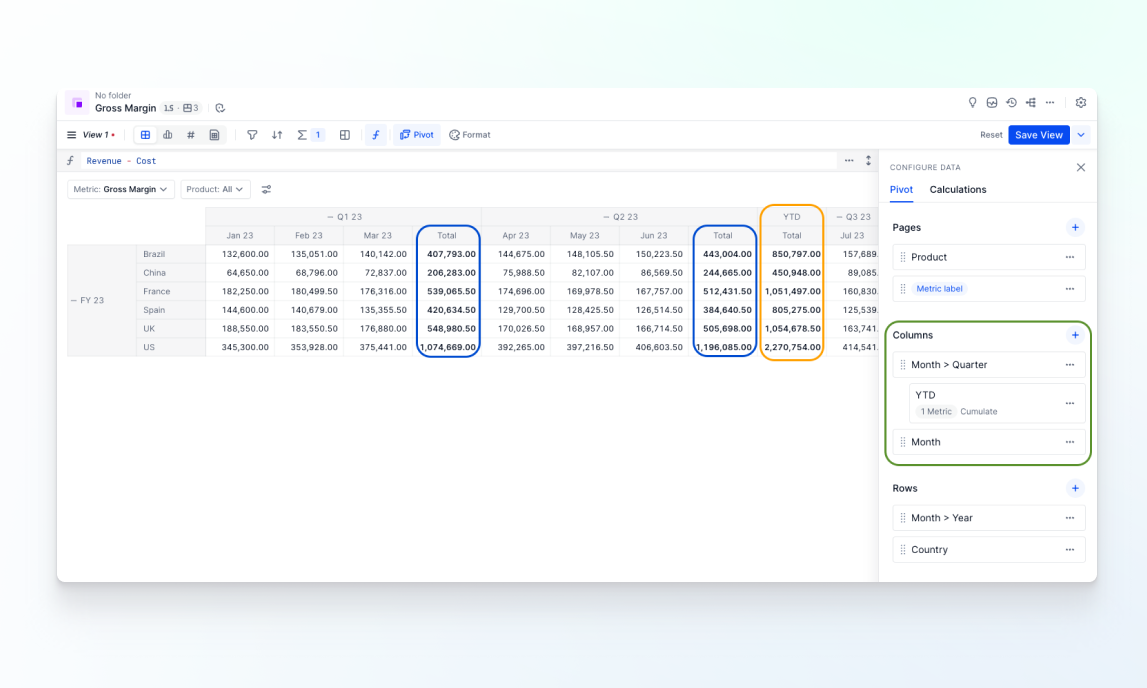
Look at the example below. The subtotals are highlighted below in blue, the Calculated Item is highlighted in orange, and the grouping Dimension and Calculated Item are both highlighted in green. In order to view Year to Date, subtotals set to SUM were created for the preceding two quarters.
Use Variables in Calculated Items
When you create a Calculated Item in Pigment, you can use a custom variable, or Item Variable, as part of your calculation. An Item Variable displays a specific value from the underlying Dimension in your Calculated Items.
Additionally, an option is available to allow Variable value changes directly on the Variable. This enables Members to easily change the Dimension Item selection in the Calculated Item without needing to edit its configuration.
The possible values are then displayed in a separate menu beside the Page Selectors of your Block, and also in whichever Board your Metric is used.
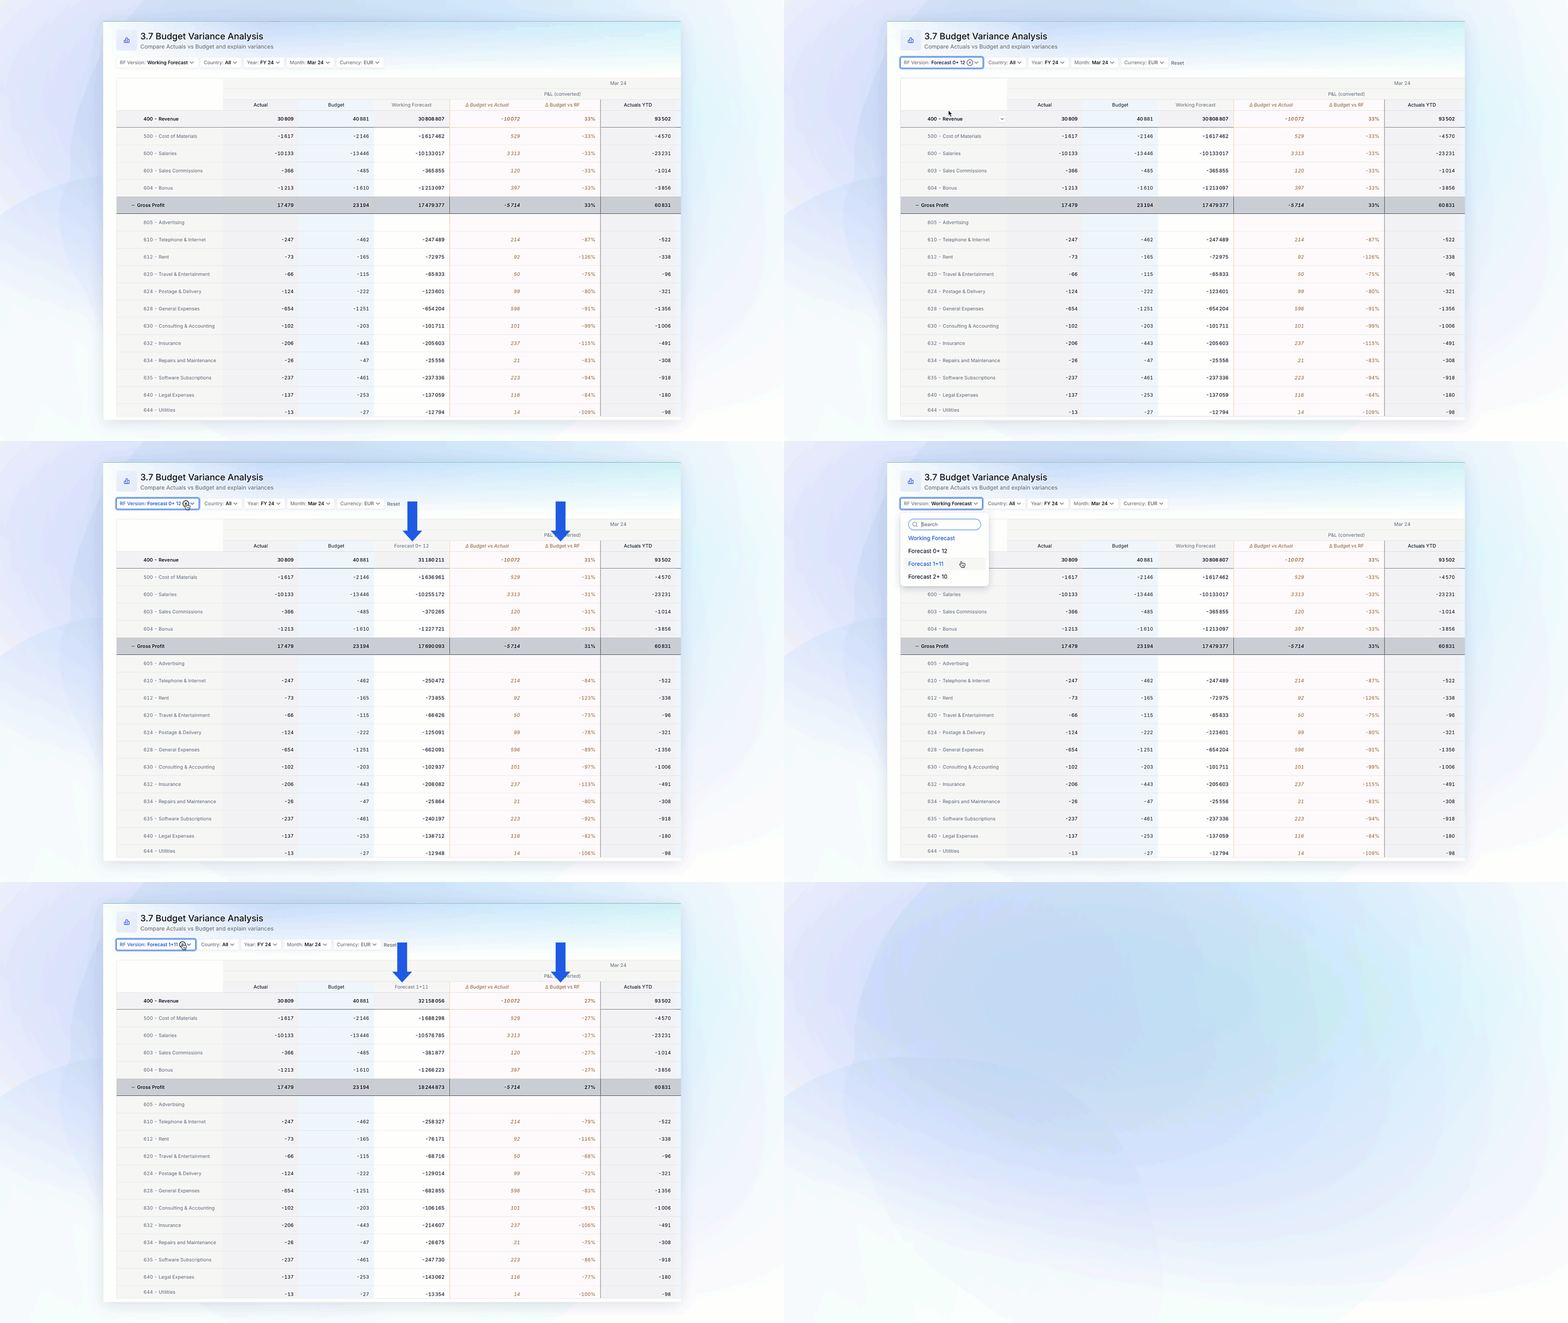
When a Member chooses a value other than the default variable value in the menu, it only applies to that Member. The customization options for this menu are very similar to how you customize a Page selector. For more information, see Let Members Change Variable Values in Pigment Sessions.
When working with Calculated Items, variables provide increased flexibility for data analysis. For instance, a Calculated Item doesn’t need to be tied to a fixed value, such as January 24. Instead, it can adapt to the current reporting month for your actuals, and be modified by an Application Admin. Additionally, analyses can be specific to each report viewer. By enabling the Let Members change the value in their session option, Members can select the specific month they wish to analyze.
For more information on how to create variables, see Item Variables.
Types of Calculations
When setting up a calculated item, you have different calculation options that you can select.
| Calculation Type | Effect |
|---|---|
| Difference: A - B | Calculate the difference between 2 specific items of your Dimension through subtraction. |
| Sum: A+ B | Calculate the total of 2 specific items of your Dimension through addition. |
| % Growth: (A-B) / B | Useful for growth calculations between 2 specific items of your Dimension. |
| % Ratio: A / B | Calculate the ratio or Percentage of between 2 specific items on your Dimension. |
| Offset | Offset will pull a value from another item in the Dimension. The options are: - Next. This pulls values from the future, or the right of a Dimension. - Previous. This pulls values from the past, or the left of a Dimension. For example, if you are using a monthly calendar, a Previous Offset by 12 will give you a value from that month last year. |
| Cumulate | Cumulate allows you to keep a running total where items are added up sequentially. When using Cumulate, you can reset values based on List properties with a type of Dimension. Cumulate is not affected by Filters or Page view selections. For example, when cumulating on March it always includes January, February, and March values, even if these months aren’t in view or if there’re filtered. |
Calculated Item Options
Here are some of the options you see when adding a Calculated Item.
- Position. This determines where the item appears in a Table or Metric. By default, it appears after the selected cell. You can select a different cell and whether it should be positioned before or after that cell.
- Item. When choosing which items to compare, they are referred to as Item A and Item B. This helps illustrate where each item is located within the calculation. For example, there is a calculation type: Difference: A - B. In this calculation the item specified in Item A is subtracted by Item B.
You can also create a static variable for your new custom calculated item. For more information, see Item Variables. - Offset. This allows you to take the value of an item from either the past (Previous) or future ( Next). The value of the Offset option is determined by the number specified in the By field. You must also specify which Dimension to offset the item by.
- Cumulate. When you toggle on this option, it adds up the values to give a running total based upon the Dimension it’s applied to. This Dimension must be present in either a row or column. This setting is applied across all items within that Dimension, even if they are filtered or visible.
- Direction. When choosing cumulate, you can choose to cumulate previous items or next items. Previous will cumulate items from the past up until the Item identified at the top. When using previous, you can use the Include current item to add the value of the item identified. Next will cumulate the values of all future or next items within the identified dimension.
Editing a Calculation for a Specific Metric
If you are working on a Table, you can modify the calculation of a Calculated Item for a specific Metric. To do so, right-click on the cell and select Edit Calculation for this Metric. You are now able to modify the type of calculation.
Presets
To make your life easier, Pigment has some Calculated Item presets for your most frequently used computations. The presets you can load depend on the granularity of your calendar and the time Dimensions in your pivot, so you cannot choose an option that can’t be computed. They are shown in the Calculated Items as menu, below the various methods of computation. You can also load presets directly from the Configure Calculate Item pane by clicking the Select Presets menu.
The list of presets available is constantly evolving and include:
- Last Month
- Last Quarter
- Last Year
- Month over Month in %
- Year over Year in %
- Month over Month in value
- Quarter over Quarter in value
- Year over Year in value
- Year to Date
- Year to Go
- Week over Week
- Last Week
Use Calculated Item, Show Values As or Formula?
Year to Date can be calculated in different ways in Pigment. When using Calculated Items presets, such as Year to Date, it’s important to note that these calculations can’t be referenced by other Metrics. If you want to reference the results, use the YEARTODATE function. If you want to get a quick Year to Date for an entire Metric, use the Year to date Show Value As preset.
Examples
Check out the examples below, you’ll notice a few of them are combining offset and cumulate to other calculation types.
| Configuration |
Explanation |
|---|---|
| Last year’s value 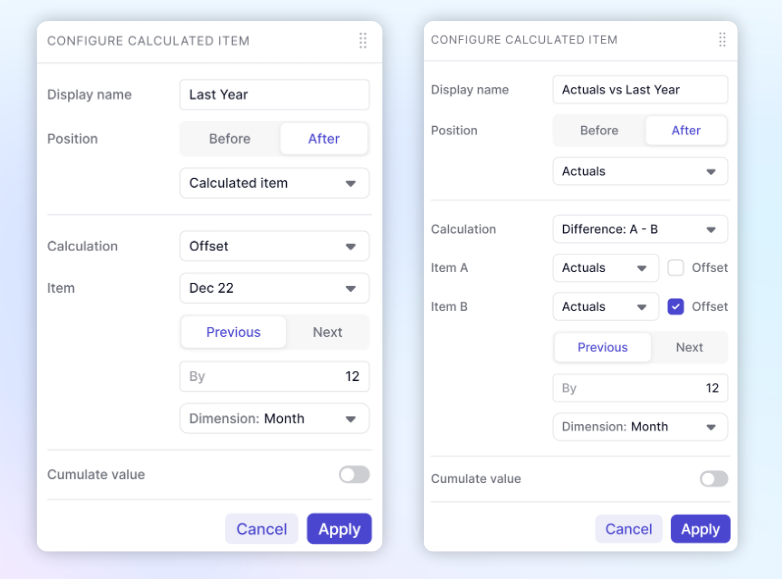
| You can calculate last year’s value by offsetting 12 months or compare Actuals vs Last year by combining an offset with another calculation type. |
| Year to date 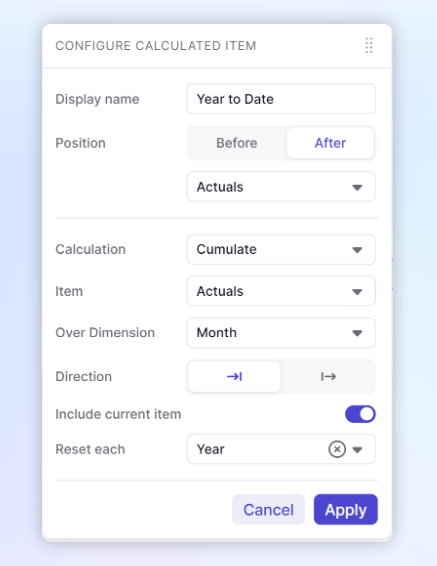
| Year to date calculations are done by selecting the Cumulate calculation and applying it to your calendar Dimension. |
| Last year’s year to date 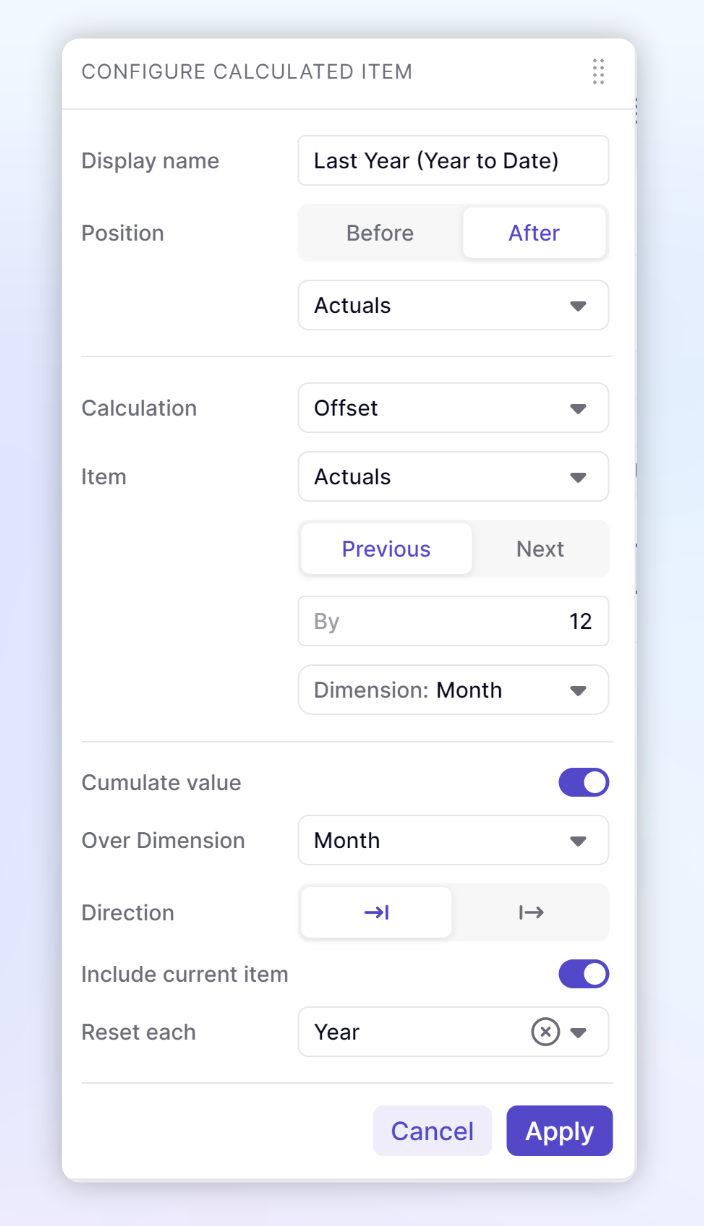
| By combining Cumulate and Offset, you can calculate last year’s year to date. |
| Year over Year growth 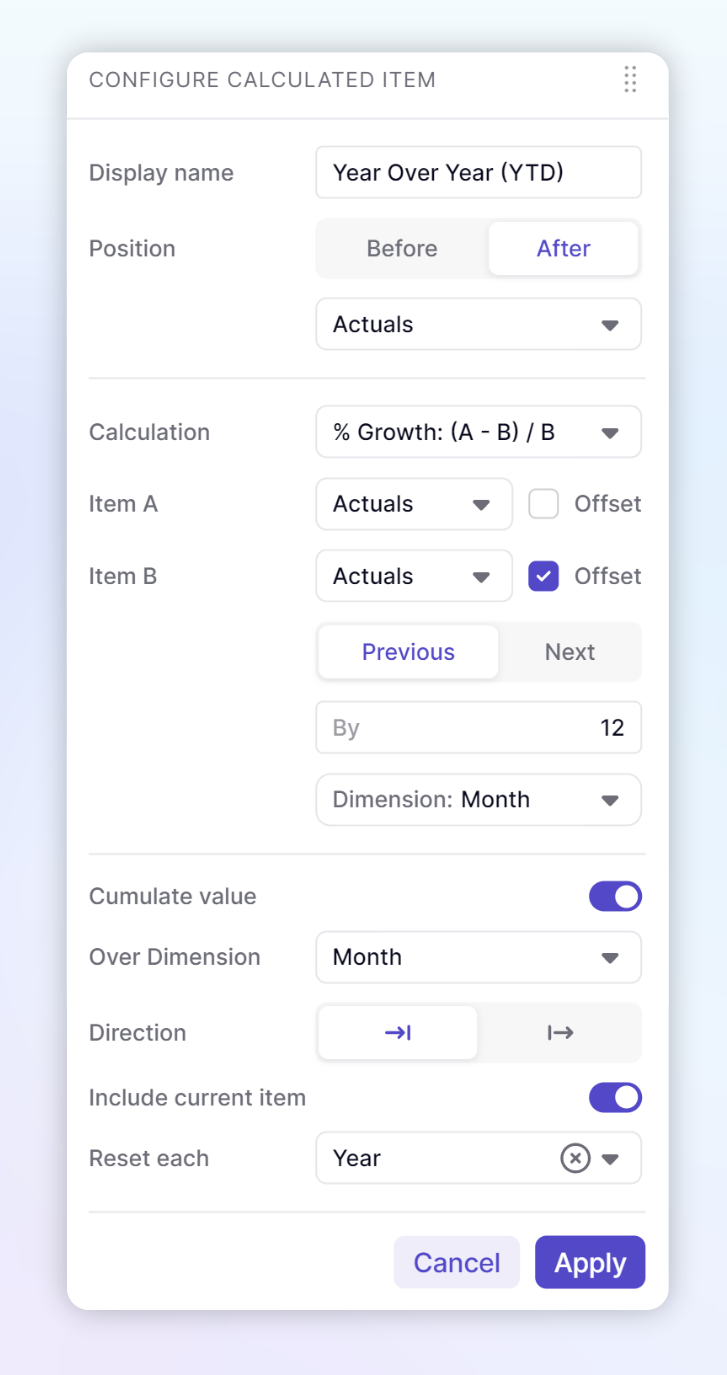
| Here is an example showing how to calculate year over year growth. You can see that you are able to use the same Item A and B. The difference is that Item B is offset by 12. You’ll also notice that Cumulate Value is turned on, meaning both items will have cumulated values |
