

Sequences provide a streamlined and intuitive way for building engaging data input flows in Pigment. With Sequences, you can organize multiple Boards into a step-by-step flow that guides Members to complete a process in a clear, structured way. This articles details how to create, configure, and manage a Sequence.
What are Sequences?
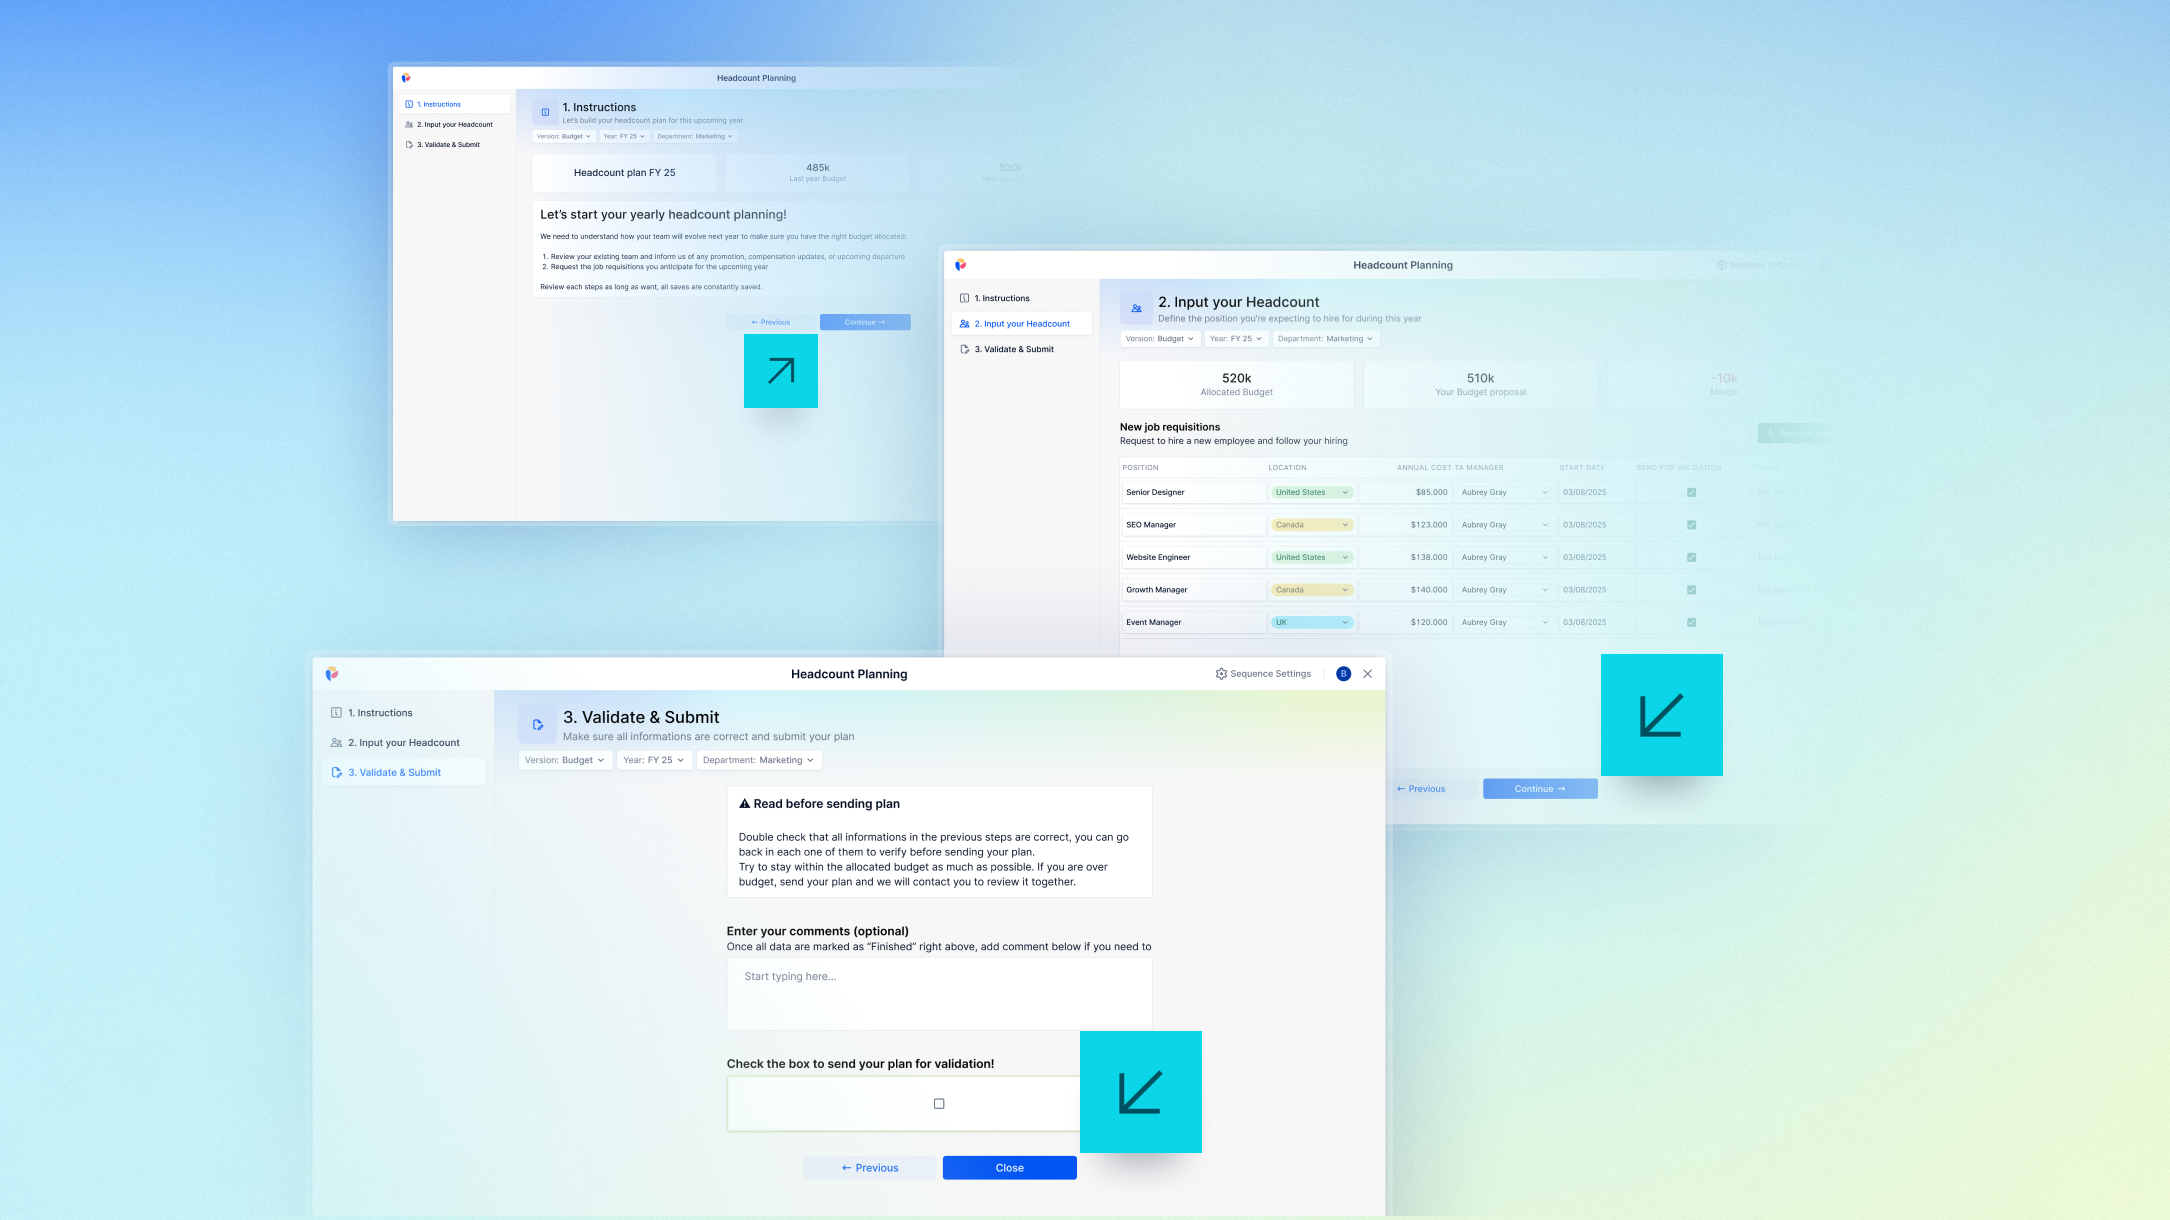
Sequences streamline how a Member completes a process in Pigment, removing the need for text-based instructions, color-coded fields, or navigation buttons to guide a Member. They create a seamless input flow that can be accessed directly from a Board or an Automation.
Each step in a Sequence defines a step in a process that requires a Member’s contribution. This help Members quickly distinguish input processes from reporting while simplifying Board navigation.
Sequences makes it easier to build, adjust, and scale processes as needs evolve and can be tailored to specific business needs.
Common use cases include:
- Financial planning, including budgeting and OPEX input.
- Workforce planning, such as headcount adjustments and compensation updates.
- Sales planning, including T&Q assignment reviews and compensation crediting inquiries.
- Supply chain management, covering demand forecasting and inventory adjustments.
 Pigment Academy
For more information on how to design and use Sequences, see the Sequences Learning Path in Pigment Academy.
Before you begin
Consider these factors when creating or using Sequences:
- Sequences inherit Board-level permissions, requiring no additional settings. If a Member lacks permissions for specific steps, the restricted steps remain visible but show a Page not found message.
- Boards used in Sequences are not visible in the Command palette, AI Board Finder, Board Selectors, or sidebar.
- Boards used in Sequences do not appear in their original folder, ensuring clear navigation and preventing Members from accessing a Sequence mid-input flow. Plan your Board organization carefully to avoid creating empty folders.
- When a Board is added to a Sequence, it no longer appears in the Application navigation. Duplicate it if the original should remain visible for Members of an existing customer implementation.
- A Board can’t be used more than once in a Sequence. Duplicate it if needed for multiple steps.
Best practices for designing Sequences
Use these tips to create effective, engaging Sequences for Members.
- Use a Welcome Board. For long processes, consider starting with a ‘Welcome’ Board to provide additional context, instructions, and any supporting information.
- Add a Review Board. For processes requiring Member input, offer a review option before submission for clarity.
- Use short names. Don’t use long names for steps, instead leverage the Board subtitle to provide a more descriptive name or further details if required.
- Leverage formatting options. Use cell status indicators to highlight input cells and arrange widgets logically in steps to guide users through data entry. Use narrow pages and status indicators to create a form-like experience.
- Apply consistent Page Selector options. Ensure consistent Page Selector options are configured across all steps in the Sequence to define the context of the flow for users.
- Choose the appropriate navigation orientation. Use Sidebar or Top navigation based on Board complexity. Top navigation works best for larger Boards with more widgets to maximize space and improve clarity.
Create a Sequence
To create and configure a Sequence, you need at least one Board. Existing Boards are used to create steps, which are then arranged to define the process Members follow.
 Important
Only Workspace Admins and Members with the Can Configure Boards permission can create and manage a Sequence, view all Boards, and view the Sequences folder.
Boards in a Sequence should include only the necessary widgets for each step, allowing Members to clearly navigate a process using the built-in step navigation. If a Board contains widgets for both data input and reviewing or reporting, separate them into distinct steps. To do this, duplicate the Board and use one for data input and the other for reviewing.
 Note
Note
You can't add comments directly to Widgets in a Sequence.
Selector settings persist across all steps, ensuring a consistent experience as Members move through the Sequence.
To create a new Sequence:
- Go to your Application.
- Select the plus symbol next to Boards.
- Select Create a new Sequence.
- In the Name & Icon section, enter a name and select an icon.
- In the Steps section, choose the first step from the available Boards in the dropdown menu.
- Select + New step to add more steps. Drag and drop steps to rearrange their order.
- To remove a step, select Remove step.
- Select a Sequence accent color to define the color for all Board headers in your Sequence.
- Select either Sidebar or Top to set the Navigation orientation for your Sequence.
- Select Create.
To prevent duplicate Boards, you can reuse existing Boards within an Application across multiple Sequences in the same Application. Boards from one Application cannot be added to a Sequence in another. If needed, create a new Board within the Application.
Edit a Sequence
Workspace Admins can view all Sequences in an Application under All Sequences in Boards. This section is not visible to Members. Any Sequences you have permission to view will be listed under Sequences. You can edit Sequence settings to add or remove steps or update formatting.
You can do this in two ways:
- From the sidebar. Select the three dots next to the Sequence name and choose Edit Sequence.
- Directly in the Sequence. Select Sequence settings to make adjustments.
Note
Removing a step linked to a Board used in other Sequences hides it from All Boards. If it is unused elsewhere, it moves back to its original folder and becomes visible again.
Edit a Board in a Sequence
Workspace Admins can edit any Board in the Sequence, just as a Board is normally edited. Any changes made to a Board associated with a step will apply to all instances of that Board across Sequences.
To edit a Board in a Sequence:
- Open your Sequence.
- Go to the step you want to edit.
- Select Edit in the top-right corner.
- If the Board appears in other Sequences, a notification will list them. To proceed with changes, select Edit Board anyway and make your edits.
- Select Done.
Delete a Sequence
Deleting a Sequence does not delete the Boards within it. Boards will be moved back to their original folders if they are not used in other Sequences in your Application.
To delete a Sequence:
- In your Application, go to All Sequences in the sidebar.
- Select the three dots.
- Select Delete Sequence and move Boards.
How to access a Sequence
Members can access a Sequence independently or through an automated notification or trigger.
Automations bring Members into Pigment when needed, either at a set time or when certain conditions are met. They can direct Members to the start of a Sequence or a specific step, ensuring they contribute at the right stage of a planning process. The built-in navigation guides Members through each step in order, reducing uncertainty.
Important
Workspace Admins and Members with the Configure Boards and Configure Automations permissions can define how Members access a Sequence.
Use an Action widget
Add a button or card to your Board using an Action widget to direct Members to a Sequence or a specific step.
For more information on using Action widgets on Boards, see Action Widgets.
Use Automations
Automations bring users into Pigment at the right point in a process through notifications or tasks, directing them to a Sequence or a specific step in the process where their input or review is required.
Set up an automated notification
Automated notifications send email and in-app alerts that link Members directly to the start of a Sequence or a specific step based on predefined conditions. You can prefill Page Selector values using automation triggers to customize the context of all Boards in the Sequence.
For more information on setting up Automated notifications for Sequences, see Set Up a Pigment Automated Notification.
Set up an automated task
Automated tasks notify Members when they need to take action in a Sequence. Tasks can link to the start of a Sequence or a specific step based on predefined conditions. You can also prefill Page Selector values using automation triggers to customize the context of all Boards in the Sequence.
For more information on setting up automated tasks, see Set Up a Pigment Automated Task.
Members can exit a Sequence at any stage by selecting Exit in the top-right corner of a step. When a Member exits or completes a process in a Sequence, they return to their original starting point.
How Sequences interact with Pigment Features
This section provides an overview of how Sequences interact with some of the key features in Pigment.
Test & Deploy
Note
Test & Deploy is available for Enterprise customers only. For more information, contact your CSM.
Sequences built in Dev or Test environments will not be deployed to Production, so they should be built in Production environments. Any changes made to a Board that is used in Sequences in your Dev or Test environment can be pushed to your Production environment.
For more information on how Test & Deploy integrates with Pigment features, see Understand Test & Deploy for Pigment Features.
Application duplication
When you duplicate an Application, its data is also duplicated, and new references are created on shared Blocks. Any existing Sequences and the Sequences folder are copied and remain visible in the duplicated Application.
For more information on duplicating Applications, see Duplicate an Application.