


If you find yourself having read all there is to read about Access Rights already knowing about the security panel, a difference between permission and access rights (AR), and the ability to limit access to Boards… But you’re still wondering, how exactly do I do this?
Then this guide is for you!
Table of Contents
Before getting started
This guide assumes you have a basic understanding of Permissions and Access rights covered in these articles.
This guide does not factor any Access Rights inheritance in and instead focuses on a very basic example. We highly recommend familiarizing yourself with Access Rights inheritance and making a decision on whether you should turn it off for the entire Application, as it will have a major impact on your security setup.
The Application
We are going to walk through a basic example where we want to set Access Rights by Department and Country and provide limited actions granted through permissions for a Headcount Planning Application.
It is very likely that your security setup will be more complex, but the basic principles are still the same. In this example, we will walk you through one persona, you will most likely have multiple personas that you can repeat these steps for.
Precautions when working on user management
Correct user management settings are a critical part of your Application.
Whenever you create a new rule, or modify one, you must ALWAYS TEST with a TEST user having the SAME ROLE and AR as your target Members.
An acceptable test means going over EVERY BOARD in EVERY Application the user has access to.
As you are following this guide, create a test user in your Workspace and connect with a private browser, so you can test as we progress.
If you are only testing Access Rights and you are a Security Admin, you can use the impersonate functionality, but this will not address permissions or Board access.
Members must have the Define Application Security Permission to view the Roles, permissions & access page in the Settings tab.
Step 1: Setting up Roles
The first step in setting up your User Management and security plan is to establish Roles. Roles will grant application access, define the actions a Member can perform, and set the default read and write access for the Application.
Each Pigment Application has its own individual security settings, these can be found in the Roles, permissions & access page within an Application. To access the page, click on Settings from the sidebar in your application, then select Roles, permissions & access.
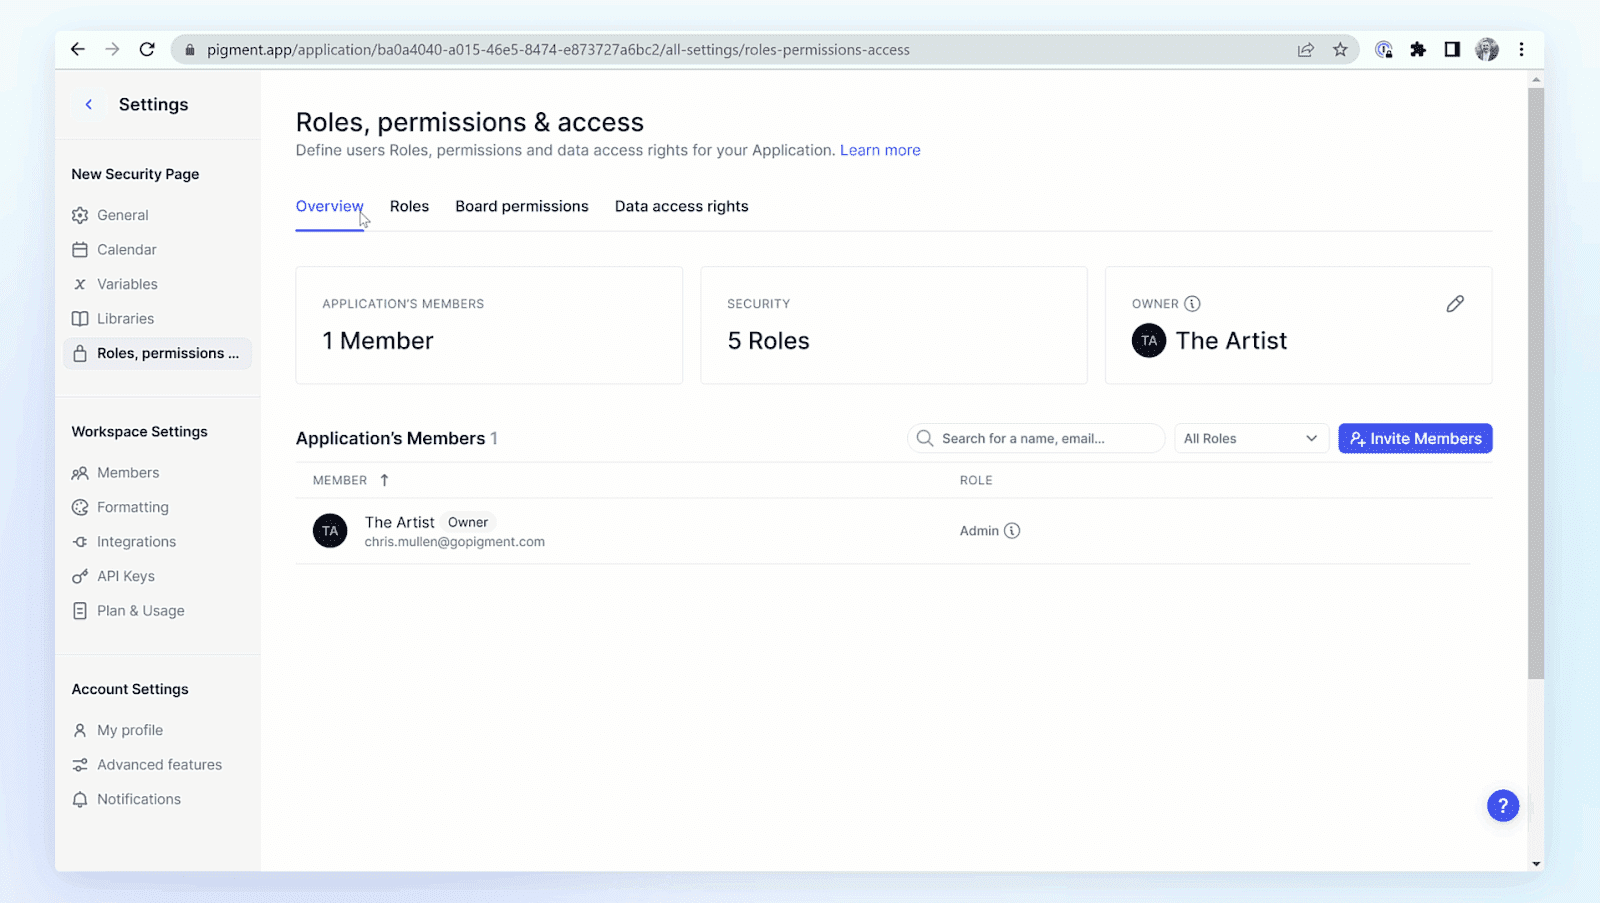
For now, we are going to focus on the Roles section.
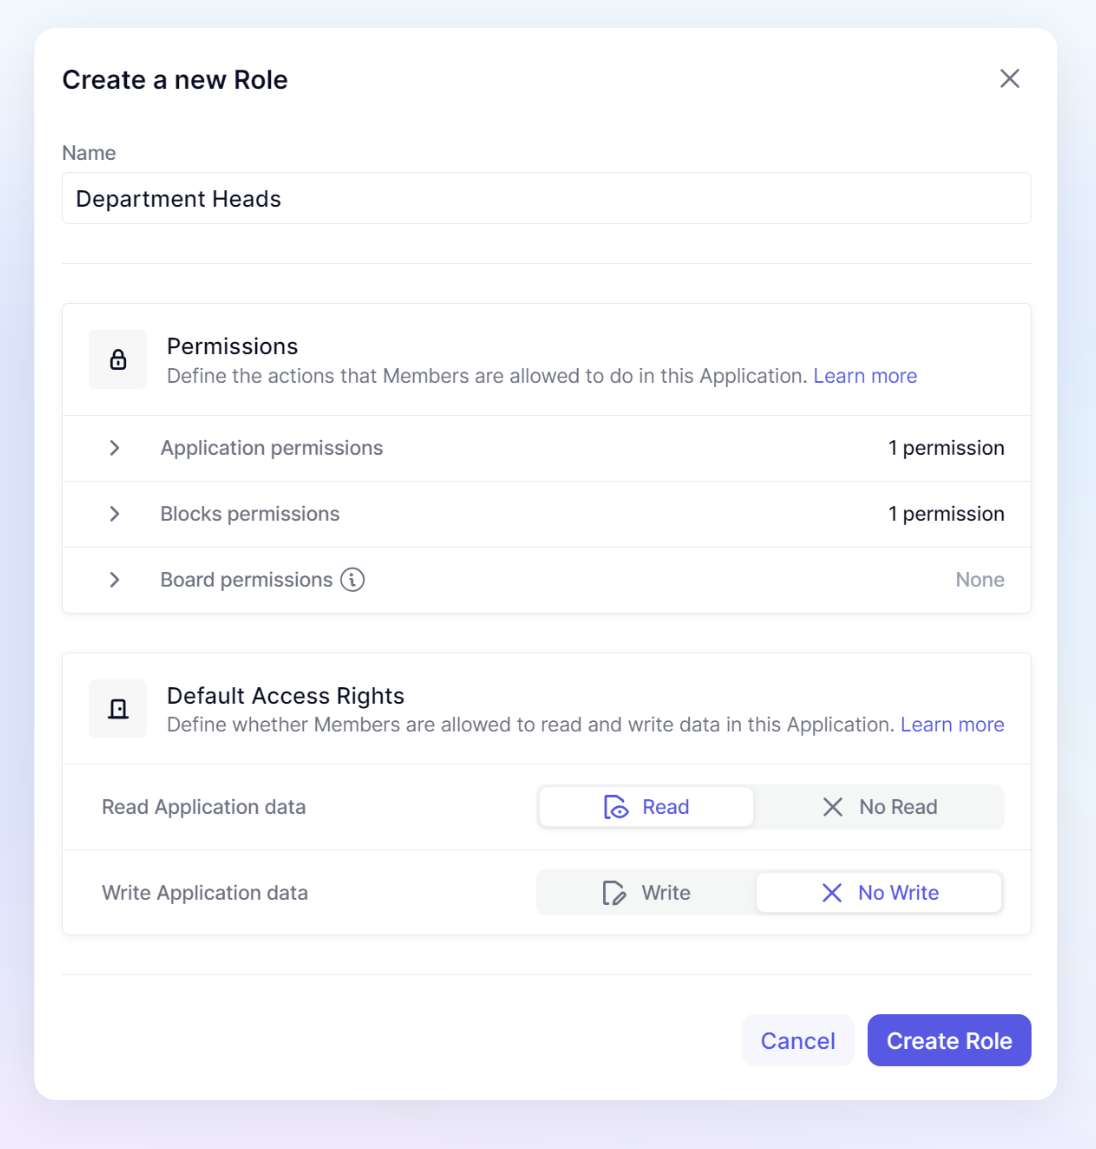
In the Roles section, let’s create a new Role called Department Heads.
We are going to choose some standard permissions, please review permission options to better define your needs.
Display Application: Allowed → the user will see the App on their homepage and be able to open it, must have this permission to see an application.
Import Data: Allowed → the user will be able to load data from a CSV file where they have access.
Boards Default permissions: None → If given, the role will have access to ALL the Boards. Better to leave it to None for business users (in most cases). We’ll later see how to give access to specific Boards.
Roles Access by default
In this guide, we are focusing on a setup where the Roles have Read and No Write access by default.
When granting access to “Read” by default, you will need to apply rules to restrict access to some selected blocks.
When denying Write access by default, you will need to remove the User Role rule from a particular area before applying new rules. This guide will cover both techniques.
Start by giving your test user this role and follow along with this guide.
Step 2: Setting up Access Rights
The first thing we’ll do is set up several Access Rights rules that will be applied across the App to make sure Department Heads only access and read the data they should.
All Metrics used to manage Access Rights and permissions should be created in the Security folder or subfolders under the Security folder. Access Rights will not apply to this folder, which prevents you from locking yourself out, and it is only accessible for users with “Define Application Security” permission.
We recommend a naming convention starting with a prefix of ARM or ARI and ending with a suffix of READ or WRITE . ARM stands for Access Rights Metrics, these will be the Metrics that are used for creating the rules. ARI stands for Access Rights Inputs, these are the Metrics that are used on a Admin dashboard and provide the data for the ARM
Creating an input Table for Country & Department Access
The most common Access Rights we come across is giving access to a specific country and department. That means when a Department Head opens their Board, they can only select the country and department they have access to.
You can double-click on a cell of an AR Metric (if you select a user) and manually assign Access Rights. However, that’s not very scalable so we are going to set formulas to assign based on inputs from two different Metrics.
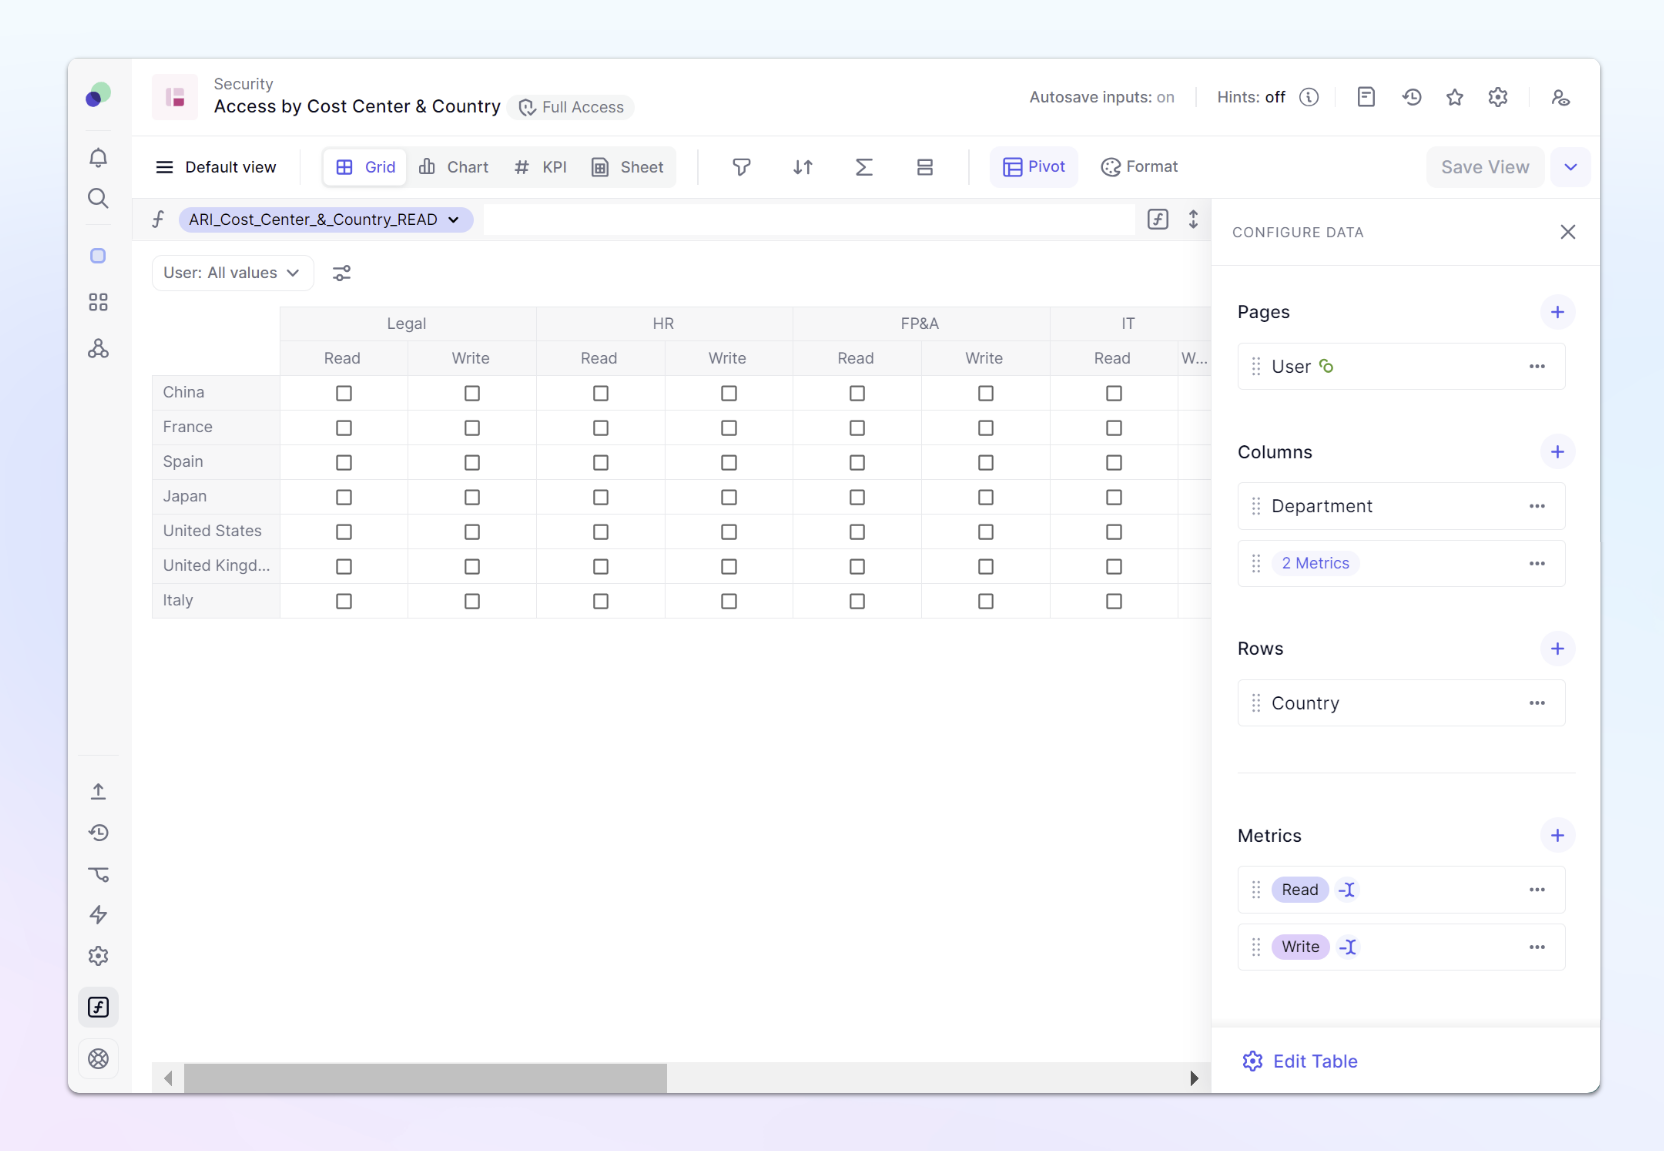
From the sidebar, open the Security folder and create a new Metric called: ARI_Cost_Center_&_Country_READ
Data Type should be boolean and it should have 3 Dimensions: User , Country and Department. This will allow us to choose a user and decide which country and department they should be able to read.
Now duplicate the Metric so we have one for “Write” access as well ARI_Cost_Center_&_Country_WRITE.
Finally, create a Table called Access by Country & Department and add these two Metrics.
Place your User dimension in “Pages” so you can easily see an individual’s access. Later we will put this Table on a Board, so you can easily define Members access when they are added.
Creating Access Rights Metrics for Country & Department Access
Now that we have our inputs, we need to create Access rights Metric that will reference those inputs.
As a reminder, our Role will grant Read and Write access to this entire application, its our job to now restrict access to areas where it shouldn’t be applied.
Go back to the Security folder and create a Metric called: ARM_Cost_Center_&_Country of data type Access Rights, using the same Dimensions as before. We will be using this for both Read and Write access, so we will not apply a suffix.
We are going to use the function ACCESSRIGHTS() This function takes two boolean parameters: Read & Write and will return an AR formatted data type. This function will take our TRUE Booleans and grant access to those Members. Because BLANKS act similar to FALSE values, All areas where a Member isn’t set to True, they will denied Read/Write access.
We are going to modify our formula, so that all Admins will have Read and Write access. In this case, the formula will look like this:
if('Users roles' = Role."Admin",accessrights(true,true),accessrights('ARI_Cost_Center_&_Country_READ','ARI_Cost_Center_&_Country_WRITE'))
Access rights configurations apply to Admin, this first part of this formula ensures Admins maintain full access. This is why its important to create a test account to test your configurations.
If you select a user, you’ll see that the result, for now, is BLANK. This assigns No Read / No Write access for all users.
Go back to the Table we previously built and enable some access for your test user:
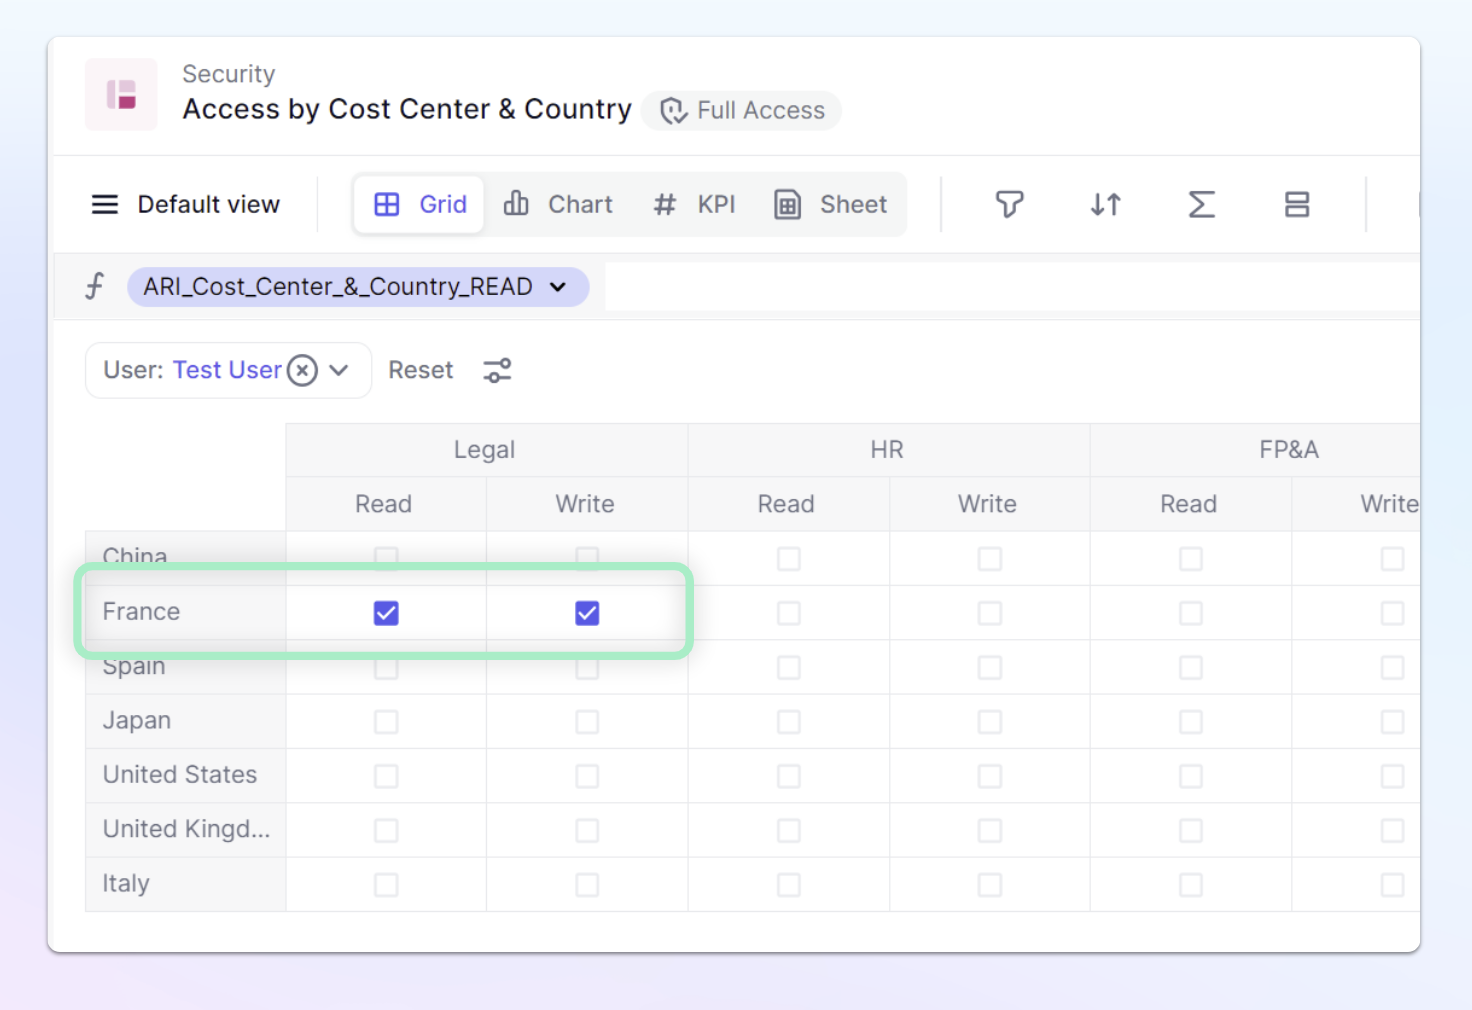
So now, our AR Metric looks like this:
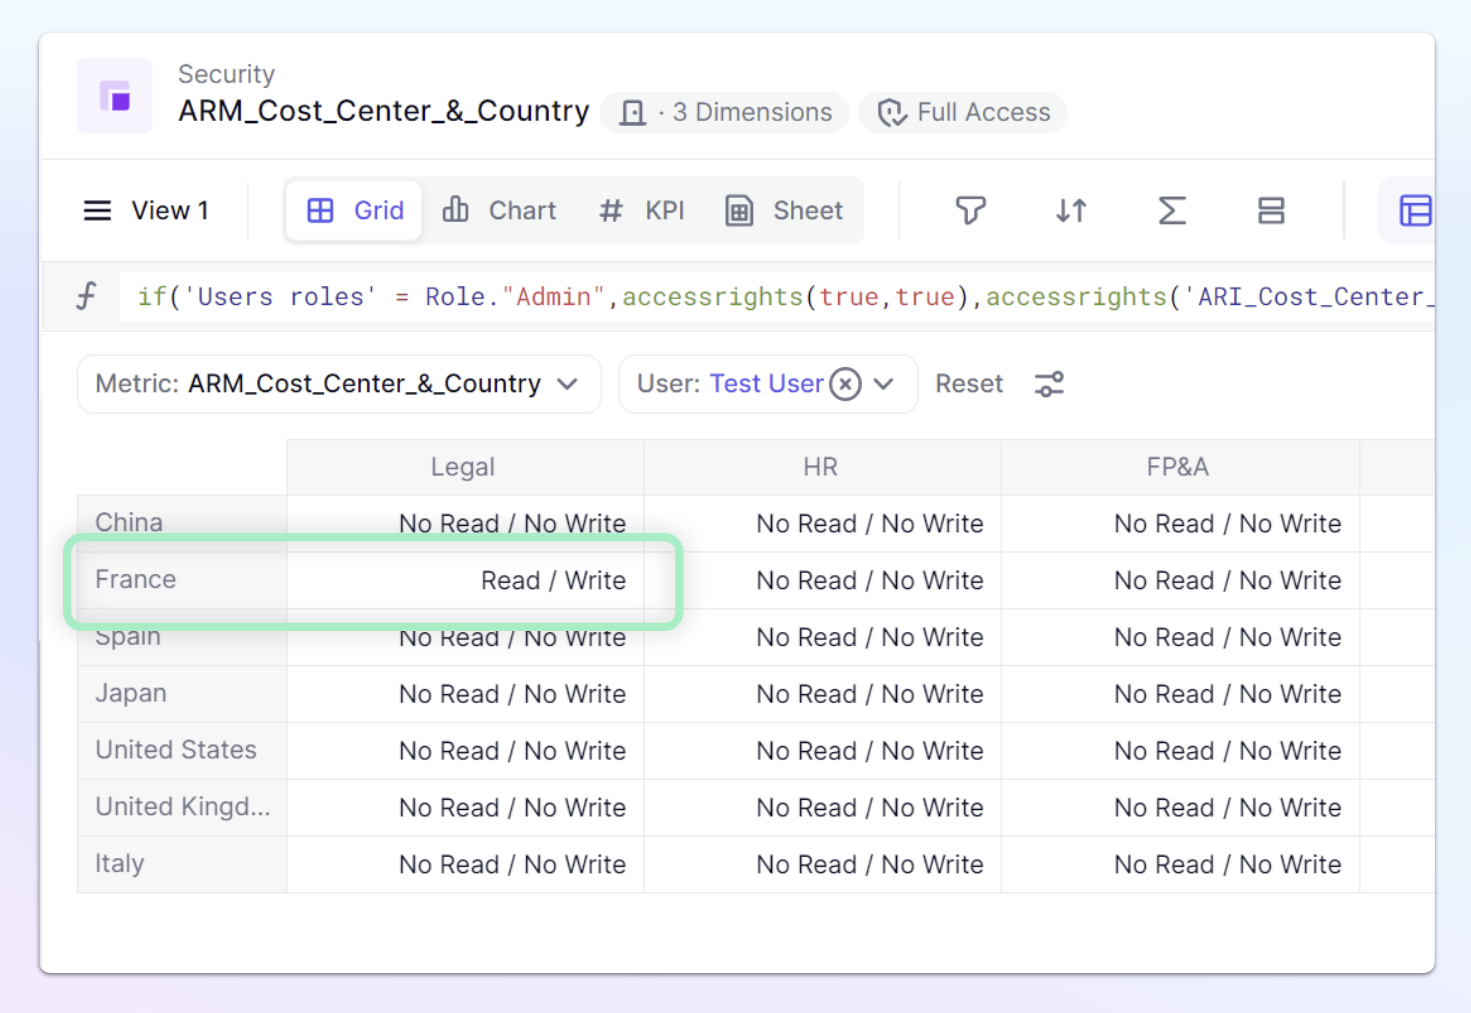
Alright, it looks like we have the result we want, and we can apply it as an Access Rights rule.
Creating Access Rights Rules for Country & Department Access
Now that we have our Access right Metric, we will need to create Access Rights rules. In our example, we are going to create an Access Rights rule for both Read and Write access and we will then apply it to all Metrics with the Country and / or Department dimensions.
- From the sidebar, click on the Settings Icon.
- Next, click on Roles, permissions & access.
- Click on the Data access rights tab at the top
- Under Rules, click the
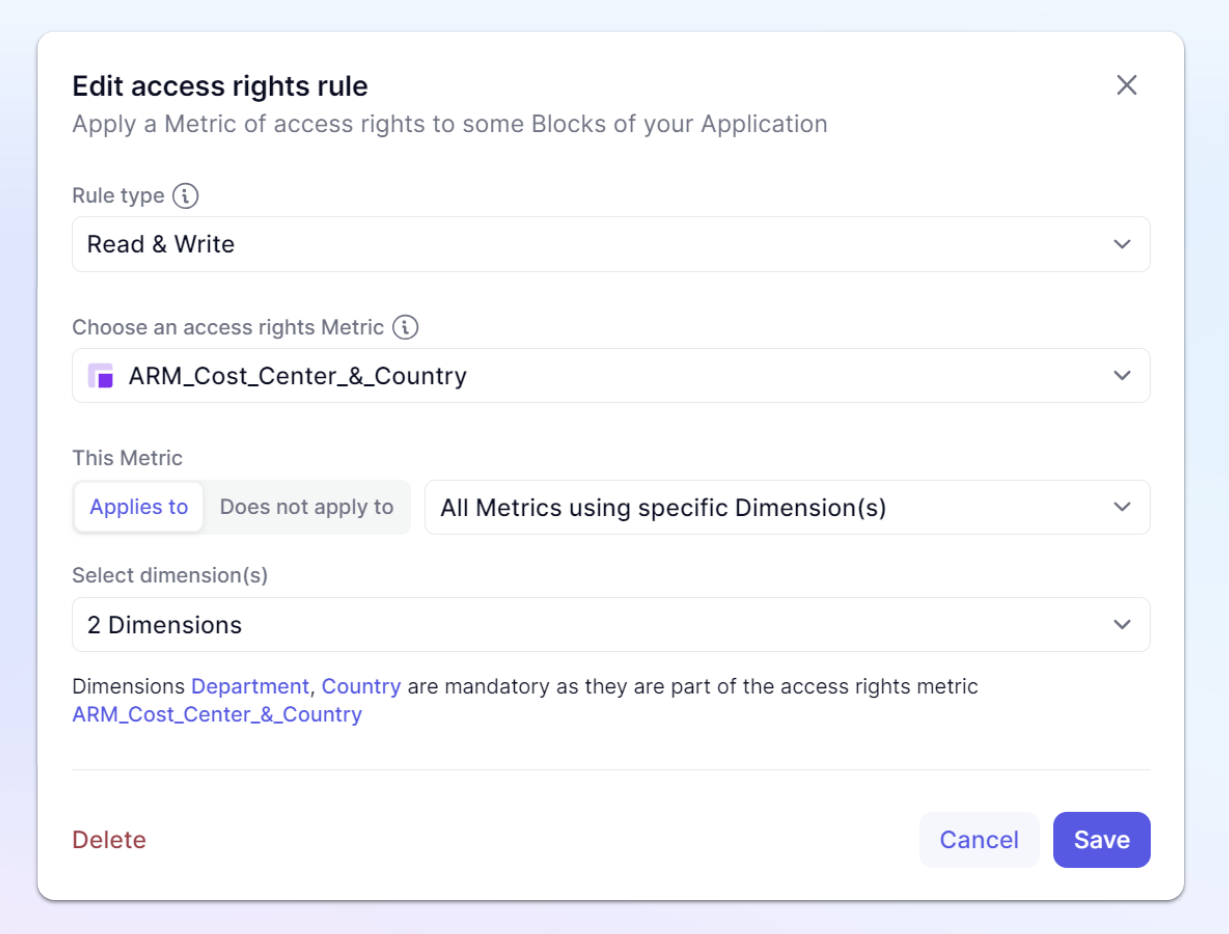
+ Add an access rights rulebutton. - Select the
Read & Writeas a Rule type. - Choose the
ARM_Cost_Center_&_CountryMetric. - Use the
Applies to - Select the area within the Application that will use this rule. In our example, All Metrics using specific Dimension(s) including the Dimensions used in your Access Rights Metric
- Hit Save
Now let’s test!
Create a test Metric with Month, Country, and Departments from your Admin account. Quickly type in some values so you can verify if you are able to read them, but don’t put in a formula, since we will test if we can write into this Metric from our test account.
In your test account, open this Metric and see if you can read and write into the combinations your access allows. When trying to write, you are going to get the following Error “You are not allowed to edit this cell.”
This is because the default User Role applies Read & Write access to all Metrics and List Properties of the Application. This means that when two rules are applied simultaneously - the User Role and the newly created rule, the more restrictive one will be applied.
In order to fix this, we will create an exception rule where we define where the User roles should not apply to.
Disconnecting the Users roles from “Write” access in Country & Department Dimensions
Now let’s see how we can define exceptions on Blocks that users need to be able to write data in, within the Application.
- From the sidebar, click on the Settings Icon.
- Next, click on Roles, permissions & access.
- Click on the Data access rights tab at the top
- Under Rules, click the
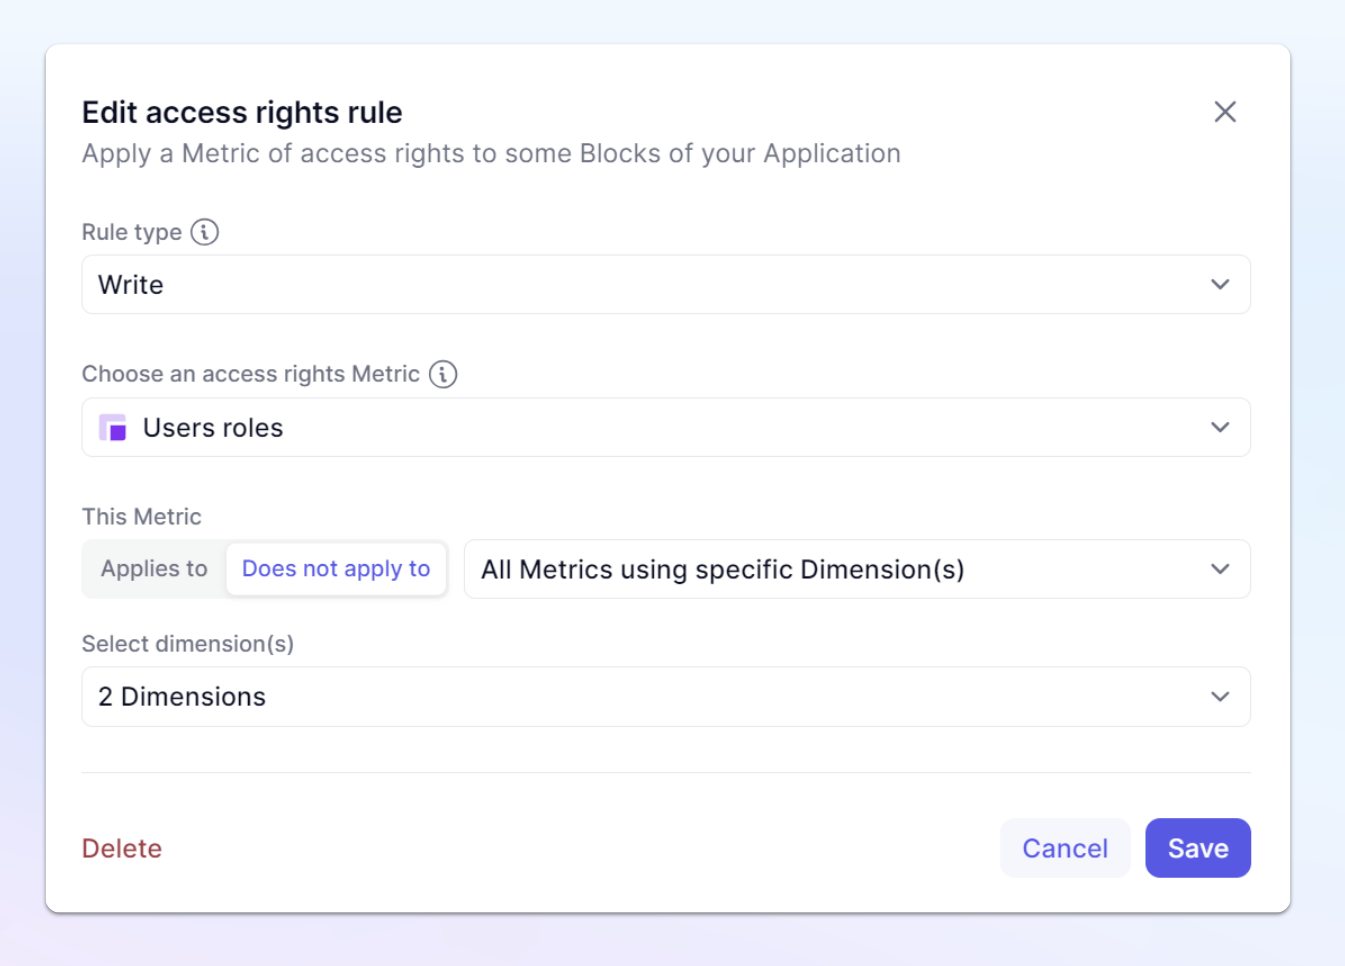
+ Add an access rights rulebutton. - Select the Rule type of
WriteAccess to Members. - Select the
Users rolesMetric. - Use the
Does not apply to - Select the area within the Application that will use this rule. In our example, All Metrics using specific Dimension(s) including the Dimensions used in your Access Rights Metric
- Choose the
CountryandDepartmentdimensions
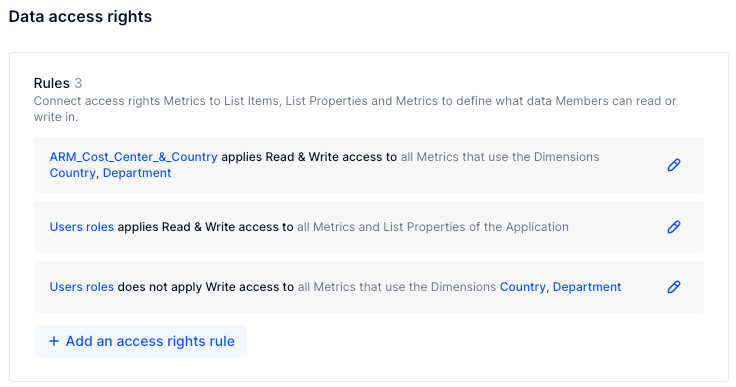
The final setup on your Data access rights tab will look like below.
The Roles default setting of Read and Write Access is still applied on all Blocks within the Application through the Users role . The exception for this rule applies on those Blocks where you have restricted the Write access for the Users Role.
With this setup, you have now set up the AR rule ARM_Cost_Center_&_Country to apply the Read and Write settings as planned.
Lets take a look at a few other examples you might want to apply.
Example to lock the past months
Lets say you have an Application where you don’t want Members to be allowed to change past periods. It could be by version, department, or plan. In our example, we will use Versions and Months, where Versions are defined by a Dimension list.
In the Security folder, create two Metrics, an Access rights input metric called ARI_Is_Actuals_WRITE and an Access rights Metric: ARM_Lock_Past_Month_WRITE , of data type Access rights with Dimensions: Users, Versions, Month.
The formula for ARM_Lock_Past_Month_WRITE will use a native switchover date:
Month.'End Date'<='Switchover date' . We can also enable overriding the formula, in case we want to apply differences for versions or temporarily open up previous months.
The formula for ARM_Lock_Past_Month_WRITE is the following:
accessrights(true,not('ARI_Is_Actuals_WRITE' If you want Admins to be able to write in these periods, your formula would look like this:
if('Users roles' = Role."Admin",accessrights(true,true),accessrights(true,not('ARI_Is_Actuals_WRITE'))
This grants the Write access when the period is in the future or forecast. Since we want the values for the past to be FALSE, we have to put NOT in front of the reference to Actuals data.
Remember, our User Roles are set to “No Write”. This means that we will need to create two rules, one to apply our new Access Rights Metric and another to remove the User Roles default setting from here.
These AR rules should both be set to WRITE access and applying to All Metrics using Versions & Months, as the past periods will depend on the versions you have. For example, your budget will be open for the whole year, whereas the forecast will be locked for current past period. This is also why we enabled the ability to override that formula.

Example to lock the specific approval Metrics
Lets say you had a workflow on the “To Be Hired” (TBH) functionality: a user will add a TBH and this will be later validated by the Finance team.
If your new TBH is done by adding a new item to a list, you will need to add the “Add List items” permission to the Role, and you can even specify the particular list. We are going to just focus on the Access right elements of how to lock it down.
You can look at the costs of Approved/Rejected/Pending.
First step in creating this workflow is to define who can validate the TBH.
Let’s create an Access Rights input Metric in the security folder called ARI_Validate_Requests_WRITE of type boolean & dimension User Role and a Metric ARM_Validate_Requests_WRITE of type Access rights and add the Users Dimension.
The first Metric will be your input to define which Users can validate, the second one is the Metric that is applied as an AR rule.
Its formula should be:
accessrights(true,ARI_Validate_Requests_WRITE)
Now its time to create our first rule. This time, we are going to focus only on the Metric that allows for validating a TBH.
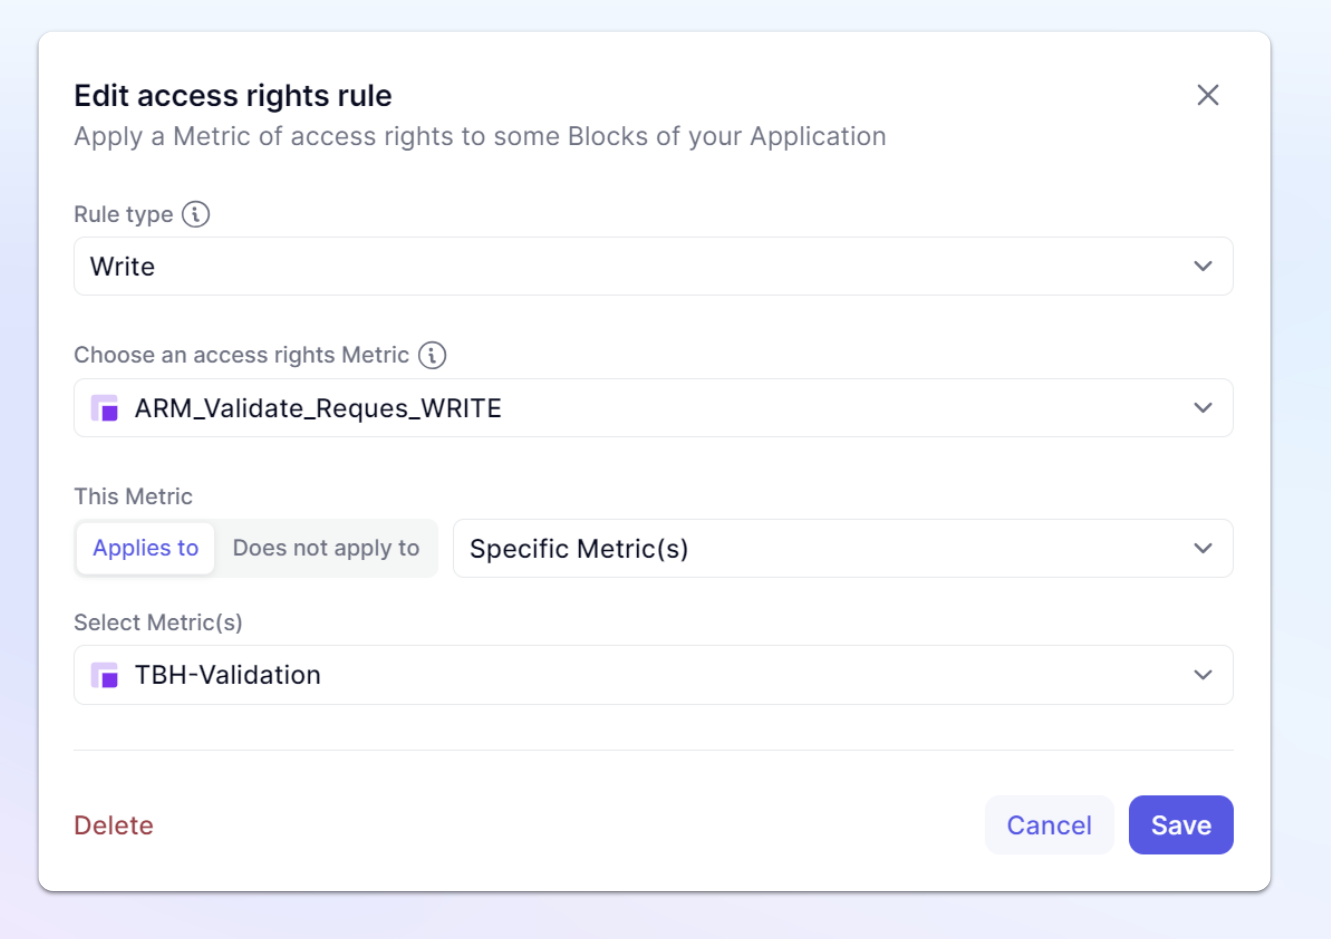
Because it is a Write rule, we have to also remember to remove the User Role from that particular Metric!
This means you will have two new rules, the one applying the Write permission and then another rule disconnecting the User roles from the TBH-Validation Metric.
But now what do you do with the values? If Finance has validated, but the user is changing the values, that’s a problem!
You guessed it, we can do another AR rule: calculating if a TBH has been validated.
That Metric will be called ARM_Lock_TBH_Input_WRITE of data type AR with Dimensions: Users, TBH, Department ,Country , Version and its formula:
accessrights(true,'TBH-Validation'<>'Validation Status'."Approved")[add:User]
This formula will give Access Rights if the Metric ‘TBH-Validation’ is different from Approved. Then add the User Dimension, so that this applies to all users.
Note that you could make an exception, so that this doesn’t apply to Admins.
Now let’s set it up in the Roles, permissions & access.
Once again, we will only select a few Metrics onto which we apply this rule: the whole ‘TBH Request’ Table. If you didn’t include an admin exception in the formula, make sure NOT to apply this rule on the ‘TBH-Validation’ Metric otherwise you won’t be able to Approve!
Rather than creating another Rule disconnecting the Roles, we can just add the selected Metrics to the Rule we created earlier that just disconnected the TBH-Validate
Check the result in the request Table, you can turn on visual hints to easily identify which cells are writeable.

Step 4: Make an Admin Board
It’s always a good practice to put all of your settings & parameters into Boards. Security is no different.
In our example, we are going to combine all elements into one Security Board, however depending on you set up, you might need multiple ones. We are going to have a Section for Roles & Permissions and another one for AR management.
When adding a new Member and assigning a role, you will use the Roles, permissions & access section, this is just to verify the Role someone was given and be able to quickly review permissions.
In this section, we have added the User Role Metric and a Role dimension.
The next section is the AR (Access Rights) Management section. Here you can see we have added the ARI_Validate_Requests_WRITE Metric, and the Access by Cost Center & Country Access rights input Table we made earlier.
This is going to be the section where you add any of those ARI or Access rights input Metrics that need to be set for each individual Member after they get added.
Its important to remember that the Validate Request Metric and The Cost Center & Country Access Rights table both use the User List because these Access Rights rule are applied to the individual not through their role. This allows us to choose a Member in the Board Page selectors, then instantly assign or adjust their access rights.
The final section is combined in the AR (Access Rights) Management section and is related to Access rights that is set for the Application, not necessarily for an individual. In our example, it is where we put the ARI_Is_Actuals_WRITE Metric.
Depending on your needs, you might want to put this on another Board where you handle Monthly updates or other other Access rights updates that are not related to an individual Member to avoid confusion.
Step 5: Board Access
If you’ve followed along with this guide, you’ll remember that users with the role '”Department Heads” don’t have access to any Board. Now, we are going to adjust that by giving them the ability to comment on all Boards except for the Security Board.
Lets take a look at an example of how we can create customized access to this Board.
When granting Board access, by default, the User Role Metric controls all access. What we are going to do is create a Permissions Metric.
Now, we could just do a simple manual input Permissions Metric, where we create a Metric with a data type of Permissions and add the User list. This would allow us to manually select which permission (None, Can Open, Can Comment, Can Configure) that a User should have, but that might seem quite manual.
Instead, we will look at using a Formula driven approach with an override setup on the Metric, allowing us to adjust. To write a formula, we are going to use the Permissions function. This function operates a little bit differently than other functions.
There are three options you can allocate to Members, here is the function arguments needed for each.
Can Open
permissions("{\"openBoard\": true}" )
Can Comment
permissions("{\"openBoard\": true , \"postConversation\":true}")
Can Configure
permissions("{\"openBoard\": true , \"postConversation\":true, \"configureBoard\":true }")
We are going to set up one to assign access to Members depending on their Role.
This might seem a bit backwards, why would we create a Metric to assign by Role when we can just go into the Users Role and set the default access to Can Configure?
The reason is that the User Role by default impacts every Board and later, we are going to remove this from applying to our Security Board. This way we can give other Roles access to Boards, without worrying about them gaining access to the Security Board.
Create a Boolean Metric that contains the Roles dimension, name it Board_access_by_Roles. This will allow us to choose which Roles we want to give access to this particular Board. | 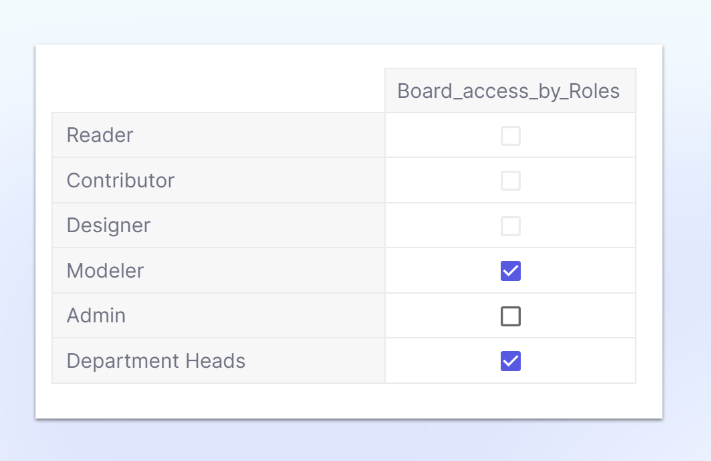 |
In this example, we didn’t select the Admin role, Admins will always have access to every board in an Application. If a Member should not, then you must adjust their role.
Now its time to create our Board permissions Metric. Create a Metric using the User List and set the data type of Permissions and we will name it Board_Permission: Security.
Our formula will look at that Board access by Roles metric and give Can configure permission to the Roles we have selected, all other Roles will be set to None or Blank.
It does this by checking each Members role from the Users Roles Metric.
if(Board_access_by_Roles[by:'Users roles'],permissions("{\"openBoard\": true , \"postConversation\":true, \"configureBoard\":true }"), blank)
Now test it, make sure you have selected the Department heads and you should see our Test user is set to Can Configure.

Now we need to make our rules adjustments in the Board section of Roles, permissions & access.
First, we are going to add our new rule to the Security Board by clicking + Add a rule of permissions for Boards.
We will use the Board_Permission: Security Metric and apply it to the Security Board.
Board Permissions work differently than our Access Rights, Board permissions will build on each other. Meaning if a Member is given Can open and Can Configure, their final access will be Can Configure. Because of this, we need to remove the User Roles from applying to our Security Board.
| Navigate to the Board by clicking on the name of the Board within our rule. | 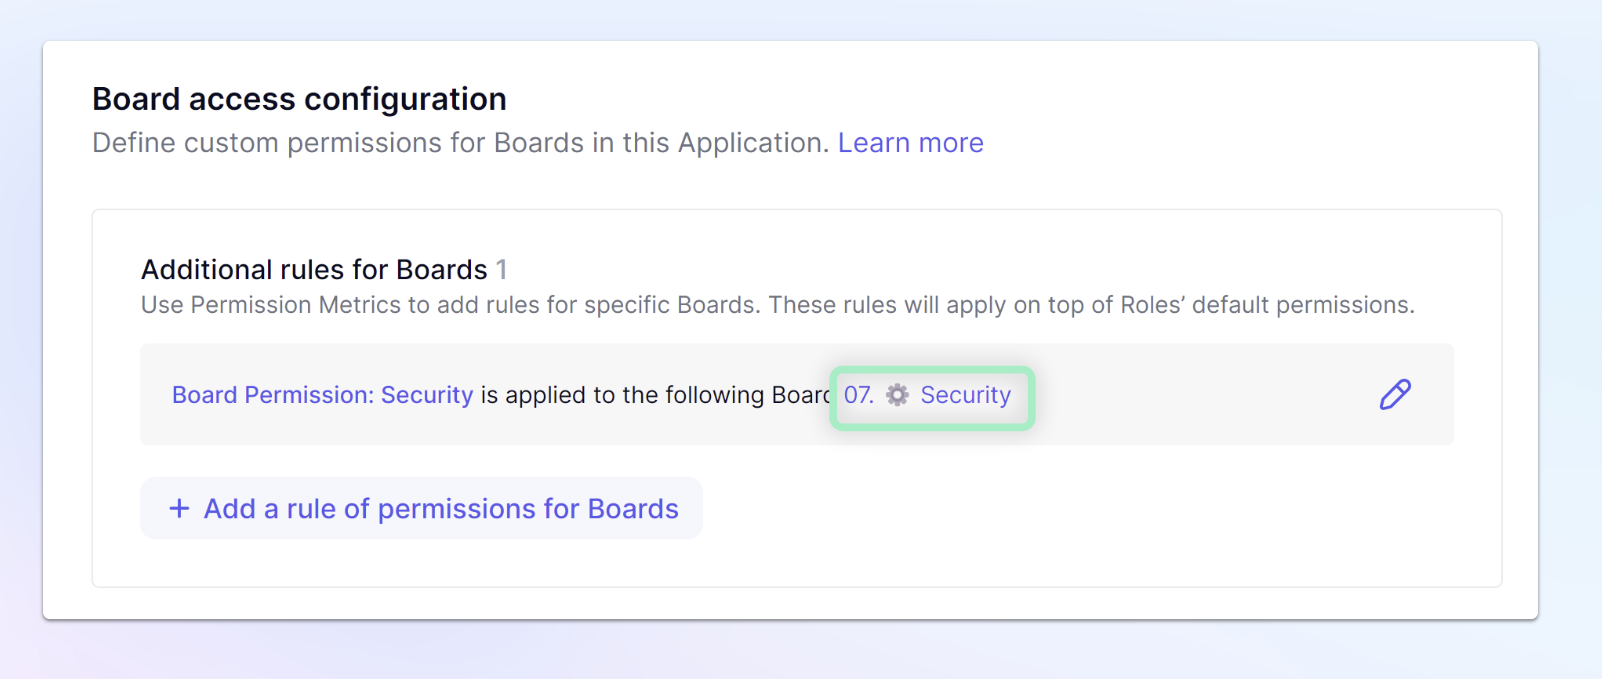 |
| From the Board, Click Share and then we will Delete our Users Role | 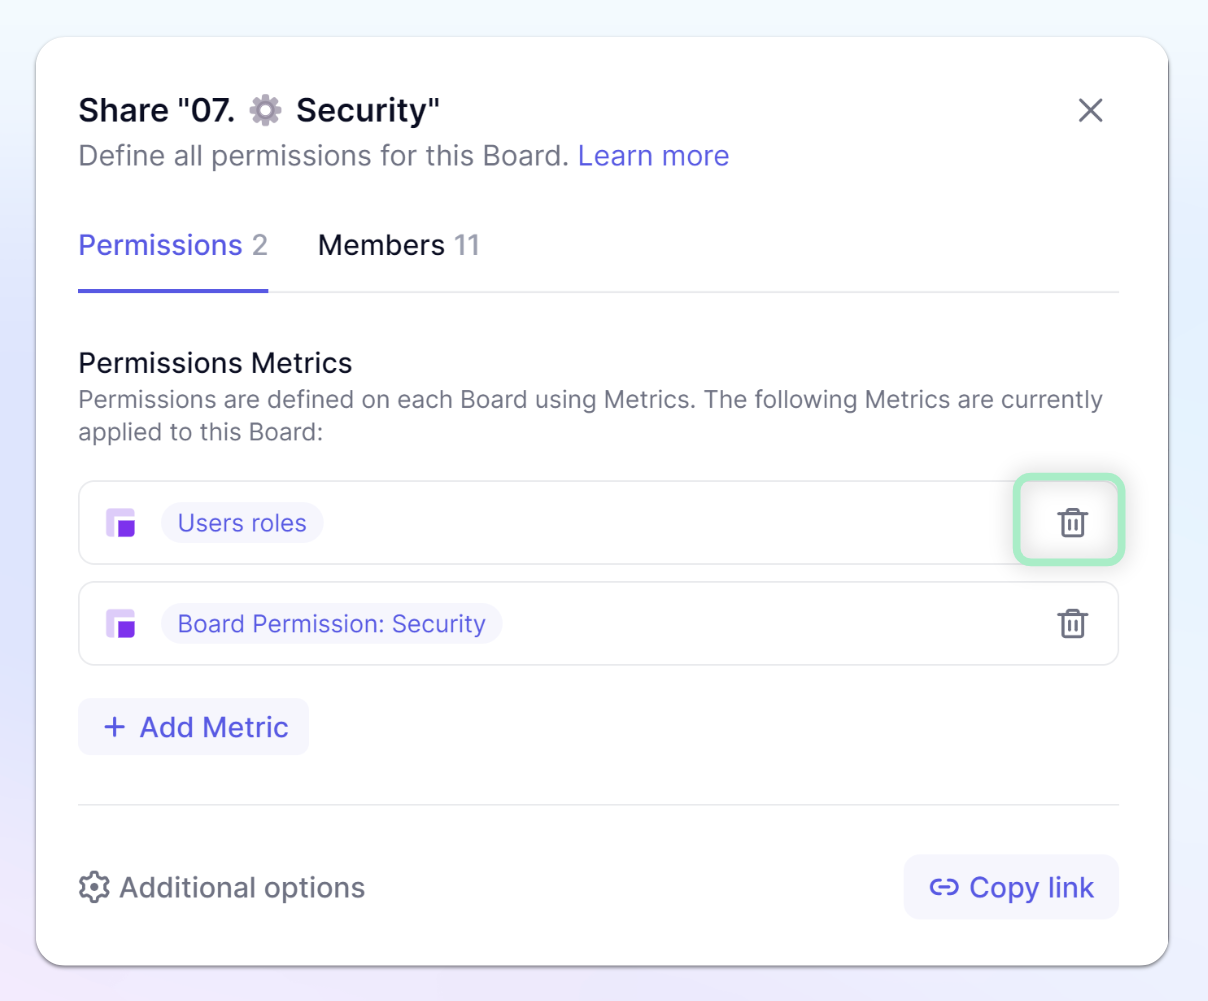
|
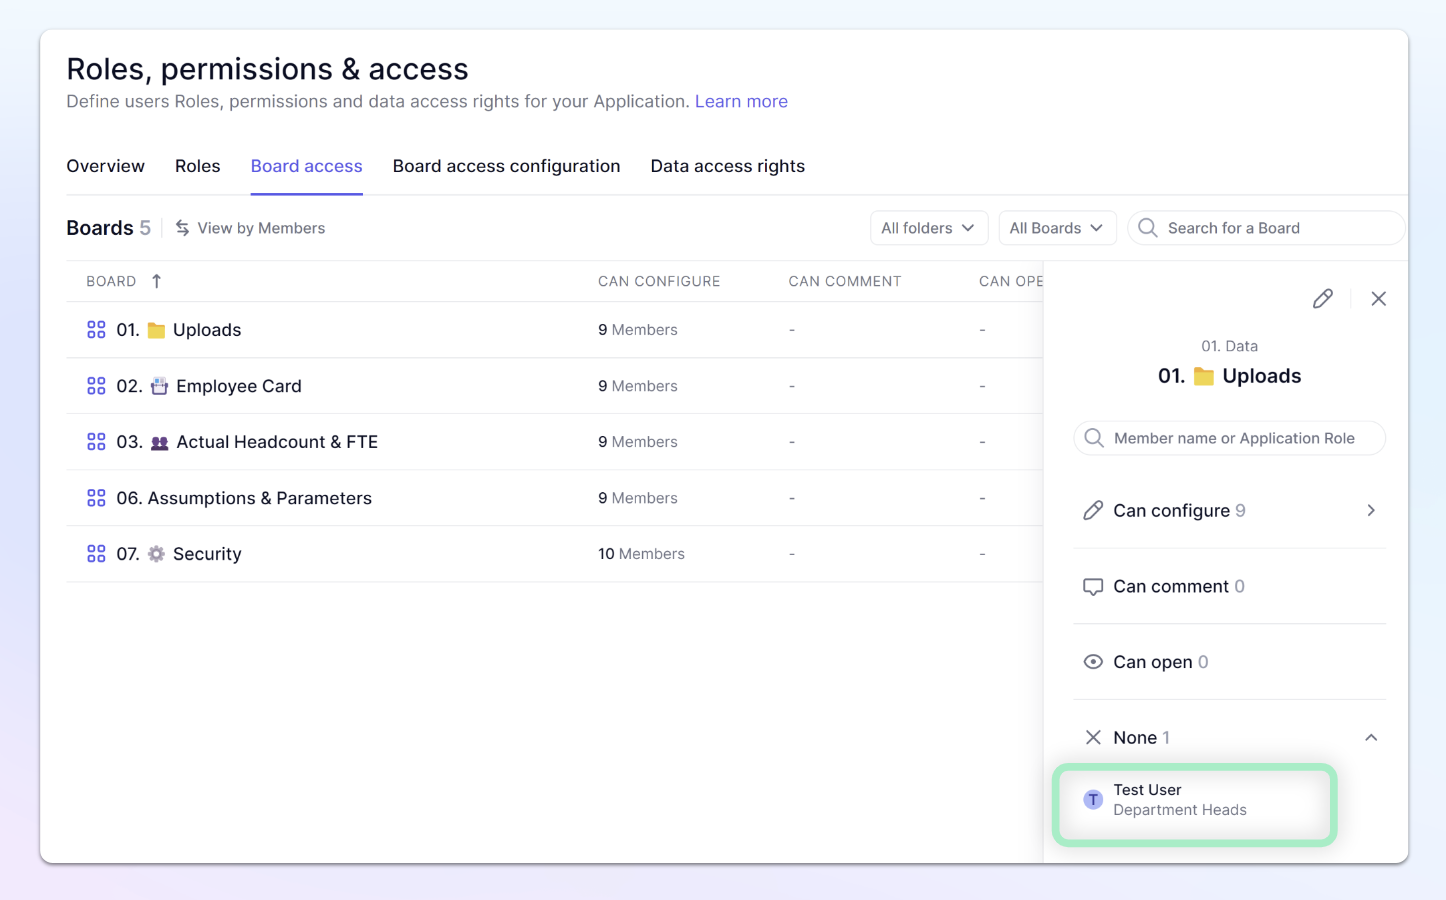
Don’t forget to check your Board access! Here I can see that for our Uploads, our Test User with the Department Heads role, does not have access. This is because we need to adjust the Role default. We can do that one tab over in the Roles section. Navigate there and set the Boards to Can Comment, now they are set!
Conclusion & Tips
Test Test Test!!! I can’t stress this enough, its so important to always test. I highly recommend creating a Test User Account and sign into it with another browser or in incognito view.
Break down security to simplify it, Permissions, Access Rights, Board Access. Try and plan for each group of users.
Permissions and Actions
Think about the actions you want your Members to perform - Will they be adding items? Creating new Metrics? or Importing data? Review the permission options to better understand which they should be given. Then create an account to assign to your Test user. Make sure to test as that user, sometimes as admins, we take for granted the things we have access to.
We also take for granted our knowledge of the platform, try viewing the platform with a Role with Open Block Explorer turned off. It provides a simpler interface for Members and might make it easier to consume.
Access Rights
Access rights works best with a plan. Planning out exactly what data should be readable/writeable and by what audience will make it a lot easier to implement.
Tip 1 - Decide early on if you want to keep Access rights inheritance on. This guide was written with Access rights inheritance turned off, making it easier to identify where rules were being applied. You want to decide this early on because it will impact data refenced using a formula.
Tip 2 - Decide a Strategy on default Access Rights on Roles. If you give Read access to all Roles, it’s your job to apply restrictions on areas that not every role should read. If you give No Write access, then its your job to create Metrics for areas where members should be able to write, and also make sure to use the “Does not apply to ” rules.
Tip 3 - Think about your process for adding new Members and a Board for that. This also plays into having a plan. Think about the characteristics of a user that will impact their access.
In our example, we knew that Department and Country dimensions would impact their access. We also looked at the ability to validate approvals. Once we identify this, we can build out ARI or Access rights input Metrics to allow us to input the characteristics for a user, then using formulas for our ARM or Access rights Metrics.
Tip 4 - Build a Board for the Security and Access Rights setup. Even though you will have user Roles, permissions, and access sections for certain aspects, its good to have a Board for all of your Access rights input Metrics.
Board permissions
Board permissions are relatively simple but there are some key things to keep in mind.
Tip 1 - We didn’t cover this but there are additional options for Board permissions that are configurable by those with Can configure permission. Members with Can configure can reduce options available for Can Open and Can Comment Members. It can be used to simplify the experience for users.
Tip 2 - Remember Admins can always see all Boards, go to the Board Access section in Roles, permissions & access to review other Members access to Boards. Remember that “Impersonate” feature does not work with Board permissions, this means you can be Impersonating someone and it will appear they have access, they might not. Please, check Board Access.
This guide covers a lot and it can seem overwhelming, but try to do your best to keep security simple and go in with a plan. Taking some time upfront to think through your solution will make it easier than trying to adapt later on!