Here’s how to make sure your Calendar is set up for your needs.
Why set up the Calendar
Each Application needs a Calendar definition, so that Pigment knows the start month of your organization’s fiscal year and the weekly/monthly/quarterly business cadence, among other things. The guidance below is to set up the Calendar for one Application, but your organization can also set up Calendar once, and share the Blocks created across Applications, by using a Library. See here for more information on using Pigment’s Library feature.
Define your Calendar
First, set up some key definitions for your Calendar:
- In your Application, select the three dots at the bottom of the sidebar and then All settings. The sidebar repopulates with settings options.
- Select Calendar near the top, opening the below in the main pane.
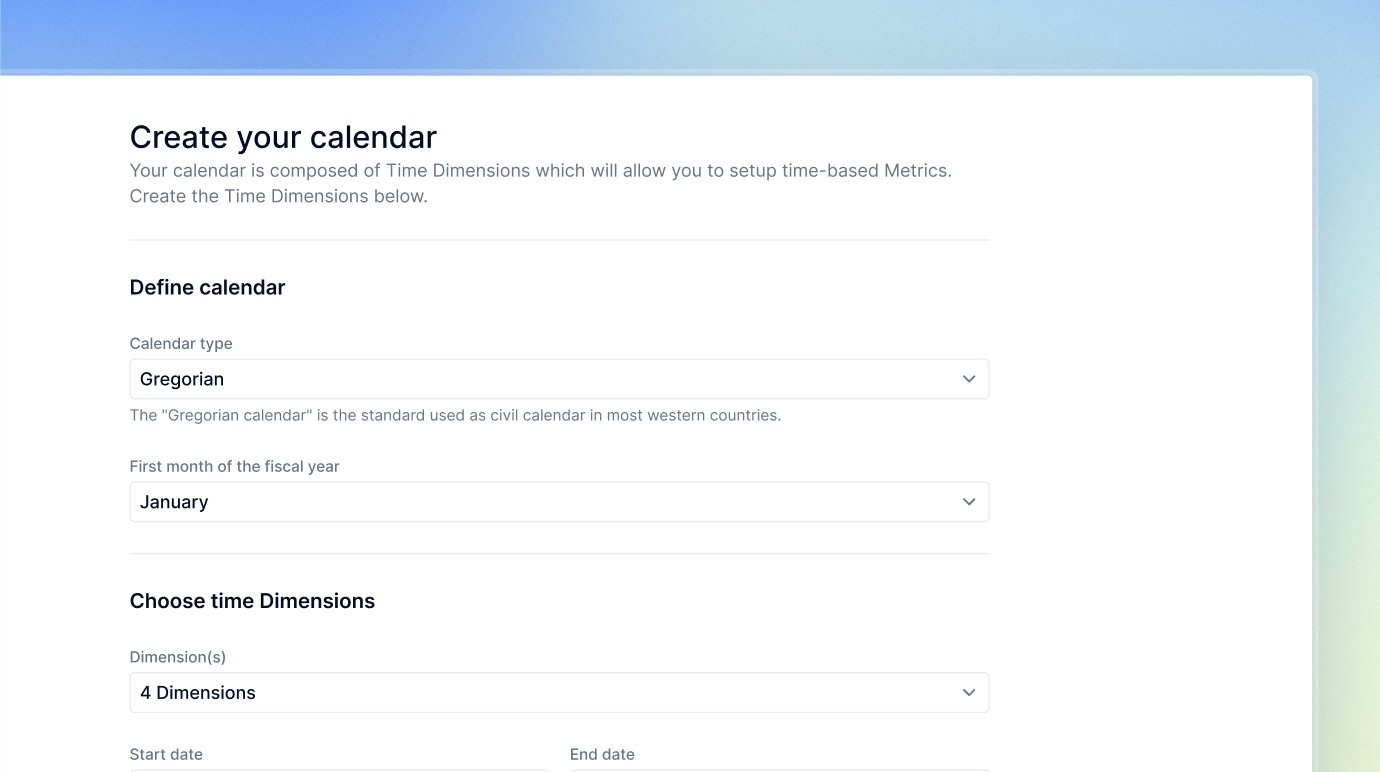
- Fill in Calendar type and First month of the fiscal year as appropriate for your business.
Calendar type and First month of the fiscal year can’t be changed after this without deleting the Calendar.
TIP
Under accounting conventions, fiscal years take their name from the year in which they end. This means that if your fiscal year runs April to March, the year starting in April 2025 and ending in March 2026 is called FY 26 in Pigment.
That’s why, if you pick any month other than January for First month of the fiscal year, your year names use the second year covered.
Choose your Time Dimensions
Then, under Choose Time Dimensions, select as many as you need from the dropdown, depending on your business’s cadence or accounting cycle. The following are available:
- Year
- Quarter
- Month
- Week
- Day
You can revisit the choice of Dimensions and Date Range at any time, but the Dimension names are not editable.
Basic configuration of Actual vs forecast
The Calendar settings dialog also offers a quick way to differentiate actual data from your forecasts. It is useful for basic or ad hoc visualizations only. Organizations that re-forecast regularly are advised to use Versions or Scenarios instead.
- Check the Actual vs forecast box on this Calendar settings page. This creates a Metric called Switchover date in your Calendar folder and adds a label to your data to differentiate forecasts from actuals.
- Select Create calendar Dimensions at the bottom to save your settings. Pigment creates all the Blocks needed.
Now set the day when actuals end and the time remaining in the period comprises forecast data, by defining the Switchover date:
- In your Application, open the Blocks dropdown in the sidebar, followed by Calendar.
- From the dropdown list that opens, select the Switchover date Metric.
- The main pane shows a single cell labelled Switchover date. Input your switchover date here.
Calendar Dimensions, Metrics and Properties
Saving your time Dimensions settings created a series of Blocks. In your Application, look again at the Calendar dropdown. Some Dimensions and a Metric have been created as below.
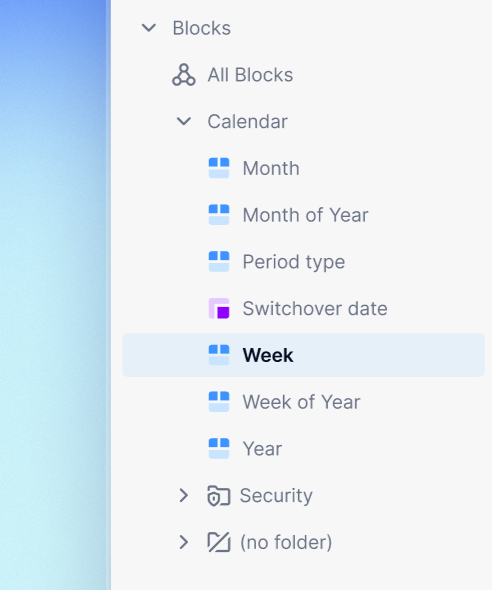
These Blocks are used for the following:
| Block name | Type | Description |
|---|---|---|
| Month | Dimension | Specifies dates of each calendar month for all months comprised in your Calendar's date range and allocates names to them (e.g. “Jan 21”) |
| Month of Year | Dimension | Comprises the months as numbers (e.g. “1”) and allocates month names to them (e.g. “January”) |
| Period type | Dimension | Labels your data either Actuals or Forecast based on the Switchover date you specified |
| Quarter | Dimension | Records the start and end dates for all quarters comprised in your Calendar's date range, according to the date you selected as the beginning of your organization's financial year, and names them (e.g. “Q1 21”) |
| Quarter of Year | Dimension | Sets up the quarters as numbers (e.g. “1”) and allocates names to them (e.g. “Q1”) |
| Switchover date | Metric | Tells Pigment that data before this date are Actuals and after this date are Forecasts |
| Week | Dimension | Records the start and end dates for all weeks comprised in your Calendar's date range, according to the date you selected as the beginning of your organization's financial year, and records week commencing date according to various conventions |
| Week of Year | Dimensions | Sets up the weeks as numbers from 1 to 53 and allocates names to them (e.g. “W1”) |
| Year | Dimension | Records start and end dates for all years comprised in your Calendar's date range based on the first month of the fiscal year you specified. The time range in Pigment is limited to 99 years. |
Calendar Dimension Properties with Editable Formulas
When the Calendar Dimensions of Week, Month and Quarter are created, they are pre-populated with useful Properties, including start dates, end dates, and other labels. Most Properties of time Dimensions are not editable, meaning they cannot be deleted, the data type cannot be changed and formulas cannot be added or updated on those Properties. Properties that cannot be edited or deleted are known as protected Properties, and are found in the Calendar and Role Dimensions.
However, there are a few Properties whose formulas are visible and editable, although they are not deletable.
If you checked the Actual vs forecast box when configuring your Calendar, a new Property called Period type will appear in the Week, Month, Quarter and Year Dimensions. The formula in that Property is editable. You can customize the IF function in that formula, for example, to have the Switchover date as part of the Forecast period instead of Actuals.
If you selected the Week Dimension when creating your Calendar, the formulas on the following Properties within Week are editable:
- Month
- Quarter
- Year
- Week of Year
The first three Properties above appear if those Calendar Dimensions were selected when creating the Calendar, although Month is selected by default. They each show a formula using the TIMEDIM function that takes the weeks’ start dates and maps them to the months, quarters and years. You can edit this formula if you need to map weeks by their end date instead of start date.
Meanwhile, the Week’s Week of Year Property contains an editable formula using the MATCH function to assign each week a label from 1 to 52.
Calendar Block substitution
If you have a non-native Week in your Calendar, you might want to substitute it with the native Week dimension for Gregorian calendars.
Follow these steps for this:
- As this is a structural change, duplicate your Application and perform all the following steps in the duplicate as a test.
- Rename your current Week Block "Week_Archive" or similar.
- Add native Week to your Calendar:
- In your Application, select the three dots at the bottom of the sidebar and then All settings. The sidebar repopulates with settings options.
- Select Calendar near the top.
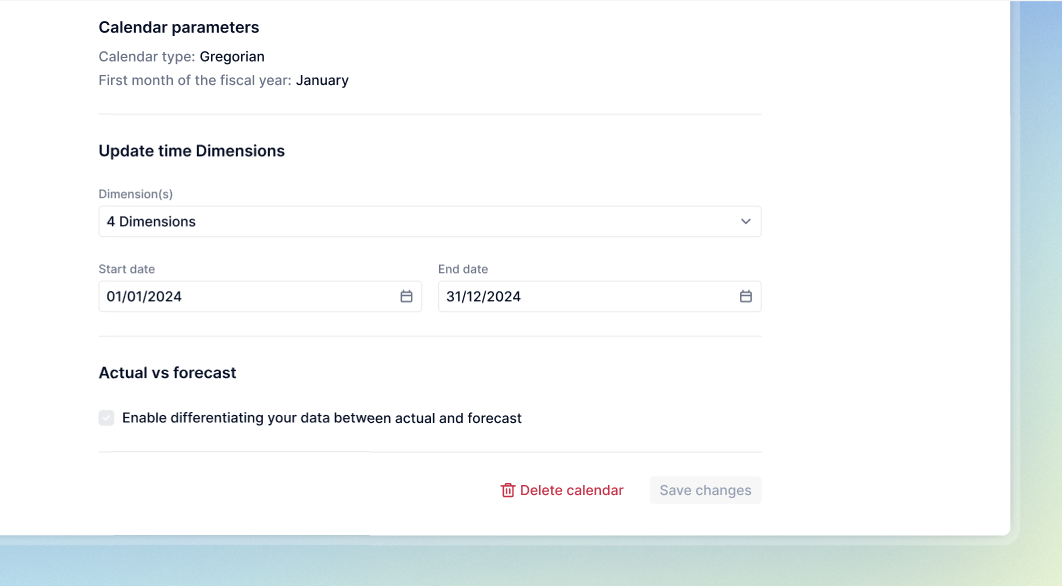
- Under Update time Dimensions, select Week in addition to your existing selection.
- Use Substitute Blocks to switch to the new Week dimension.
- Note that manual inputs and any custom Properties will be lost. They must be set up again manually from the duplicate.
Ways to use the Calendar
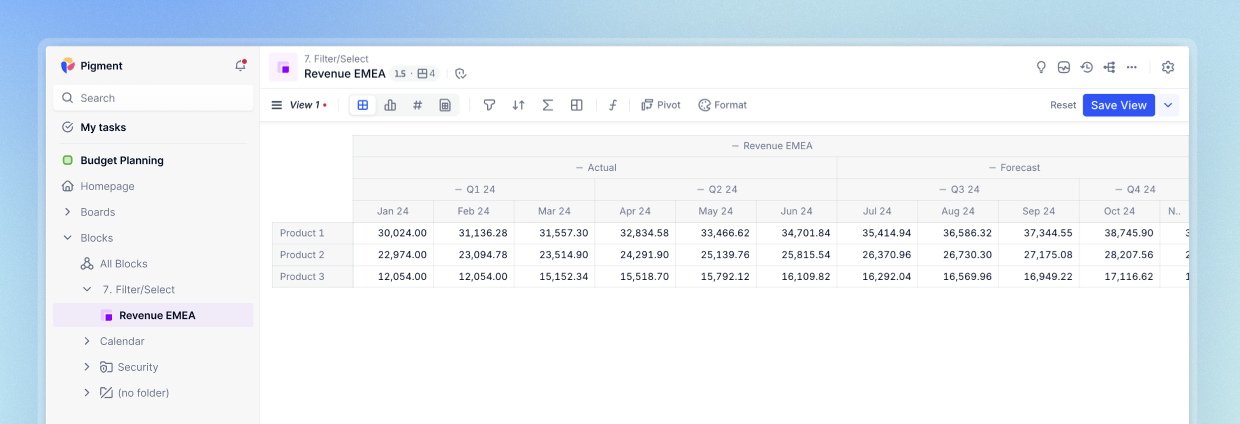
It is now easy to create Metrics based on time Dimensions. Below, a Metric has been created with four Dimensions, of which two are being used in the View: Month and Product.

Selecting Pivot provides display options. If, for example, you need to add Actual vs Forecast to the View, click Month > Period type.
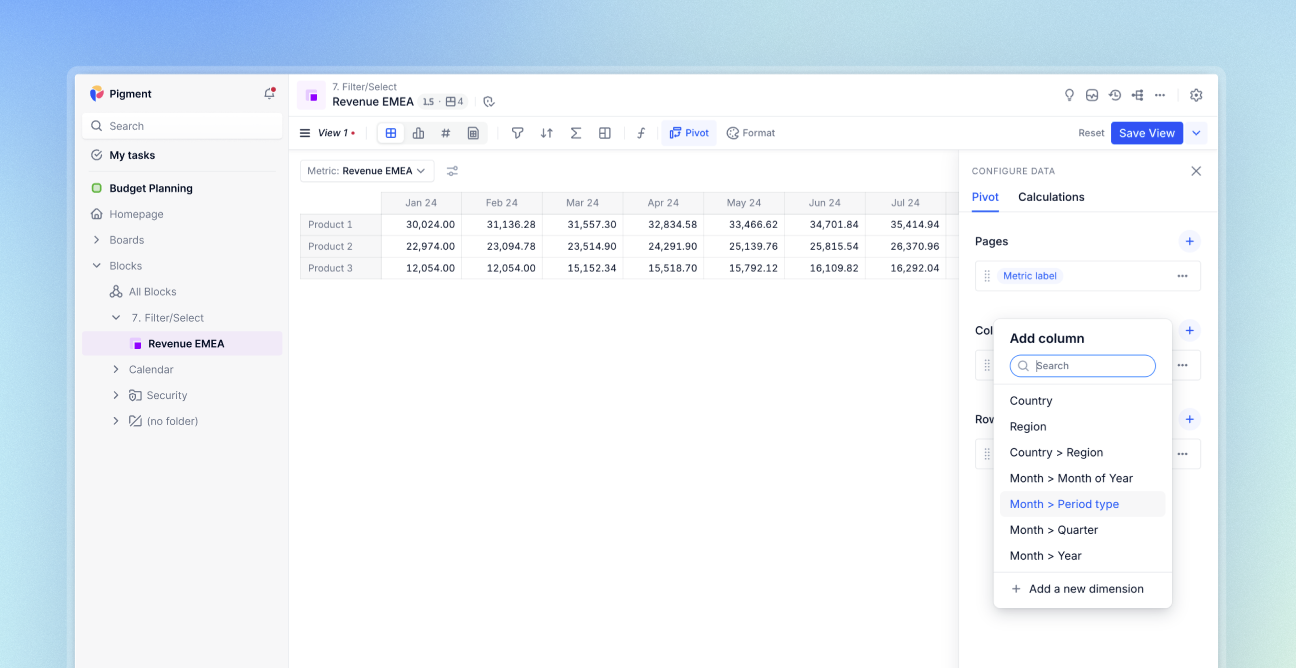
If you repeat this step, and this time select Month > Quarter, the View shows the quarter labels over the month data.
How to delete the Calendar
To delete your Calendar:
- In your Application, select the three dots at the bottom of the sidebar and then All settings. The sidebar repopulates with settings options.
- Select Calendar near the top, opening the below in the main pane.
- Select Delete calendar at the bottom, noting the following before you do so:
- You cannot delete a Calendar if its Dimensions are used in Block structures.
- You may permanently lose data on any of the Blocks that depend on this Calendar.
